Chromebook Troubleshooting Tips

Chromebook Troubleshooting Tips

These steps will resolve the most common Chromebook problems. Try them in the order listed here, until the problem is solved.

If your Chromebook is broken (cracked screen, missing keys, etc.) or missing, please skip to the last step and enter a Help Ticket.

Thumbnail image of the poster.

Teachers – It might be a good idea to print a poster of this information for your classroom. Find it here!
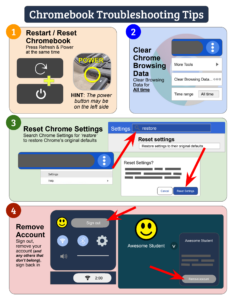
1

Restart the Chromebook

As simple as it sounds, most Chromebook issues are resolved by restarting the device.

Full Reboot

  1. Click the user panel in the bottom right corner of the screen (unless you have moved it elsewhere.)
  2. There is a power symbol   along the top of the user panel. Click it to shut the laptop down.
  3. Click the power button on the Chromebook to turn it back on. Depending upon the model of Chromebook you are using the power button may be found at the top-right corner of your keyboard, or on the left side of the device.

Quick Reboot

To perform a “quick reboot” you can hold down the refresh key at the top of your Chromebook keyboard, and tap the power key.

On some devices the power key is located on the top-right of the keyboard. On other devices it is found on the left side of the laptop.

2

Clear Chrome Browsing Data

Many issues are resolved by clearing the cookies and cached data in the web browser.

  1. Launch Google Chrome.
  2. At the top right, click the More menu and select “Clear browsing data.”
  3. In the time range drop-down, choose “All time.”
  4. Select all of the types of information for removal.
  5. Click Clear data.

Learn more.

3

Reset Chrome Settings

If the problem still exists, the next step is to reset Chrome to it’s default settings.

  1. Launch Google Chrome.
  2. At the top right, click the More menu and select Settings.
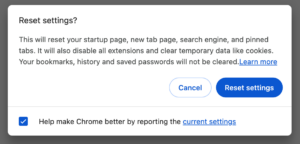
  3. In the left menu, click Reset settings.
  4. Click Restore settings to their original defaults.
  5. Click the Reset settings button.

Note: This will not change accessibility settings, or bookmarks. 

Learn more.

4

Remove, then Re-add the User Account​

If the steps above do not resolve the issue, there is a good chance that removing your user account, then re-adding it might.

Before doing this, note these two important things:

  • You must have internet access to re-add the account.
    Do not take this troubleshooting step if you are not connected to the internet!
  • When the account is removed, all files the user has saved on the Chromebook are permanently deleted.
    Be sure that you have moved any important files you may have saved in your Downloads folder to your Google Drive before removing the account!

To remove & re-add the user account, follow the instructions on these LPS Google Docs.

Other helpful info...

If you are trying to do one of the things listed at right, these resources may be helpful!

5

Create a Student Help Ticket

If none of the troubleshooting ideas on this page address or resolve your issues, You should submit a student Chromebook help ticket.

Click on “Stuhelp” in the LPS Portal, then follow these instructions to submit a student help desk ticket. LPS Computing Services will contact you as soon as possible.

Each school handles these a bit differently, but your Teachers or Librarians will know where to direct you.

LPS Computing Services visits each school every day to investigate student Chromebook issues. There are “loaner” devices that you can use until your Chromebook is returned to you.