LPS laptops should be running Microsoft Windows 11.
![]()
Helpful Resources
- Learn to Use Windows 11 (Dell)
- Windows Help & Learning (Microsoft)
- Keyboard Shortcuts (Microsoft)
User Logins
![]() LPS employees log into this laptop as themselves by entering their LPS user name and password.
LPS employees log into this laptop as themselves by entering their LPS user name and password.
NEVER GIVE ANYONE YOUR LPS PASSWORD, FOR ANY REASON – INCLUDING FAMILY MEMBERS OR HELP DESK EMPLOYEES.
If someone needs to use your laptop, LOG YOURSELF OUT before sharing this LPS device. You will be held professionally responsible for any violations of LPS Board of Education Policies while you are logged in.
Leave These Settings Alone
LPS staff members are granted administrative access to the computer they are issued. This means that you, as an LPS staff member, are granted permission to make changes such as installing software, adding printers and configuring system settings. This privileged access does NOT grant you permission to:
- Edit the given computer name
 Disable anti-virus software
- Disable or uninstall pre-loaded software
- Use the terminal or command line interface for ANY reason
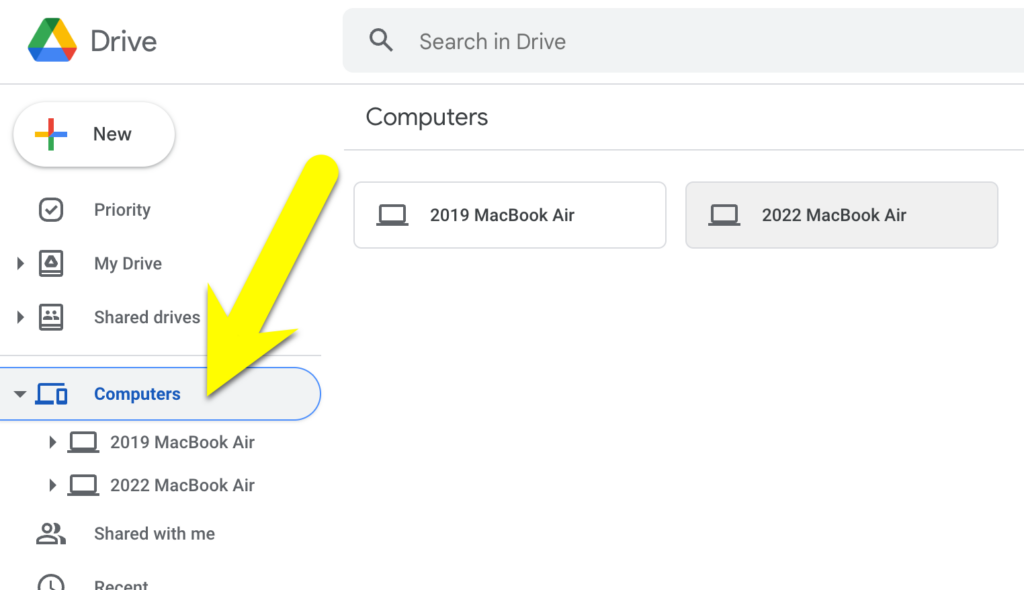
![]() Computing Services has installed a tool called Google Drive for Desktop on your LPS computer. This utility syncs your LPS computer’s files to your LPS Google Drive storage.
Computing Services has installed a tool called Google Drive for Desktop on your LPS computer. This utility syncs your LPS computer’s files to your LPS Google Drive storage.
This strategy allows you to keep some files on your computer but have them safely and securely backed up, preparing you in case of “technology disaster” or moving to a new laptop.
Setting up Drive for Desktop
Please be sure that Google Drive for Desktop is set up and working on your teacher laptop. This includes identifying the places on your laptop (like the Desktop or Documents folders) that should be mirrored to your Google Drive storage. Follow the instructions below to log in and begin keeping your computer and your Google Drive in sync.
Microsoft Office (Word, Excel, PowerPoint)
![]() MS Office (v.2021) has been installed on your laptop.
MS Office (v.2021) has been installed on your laptop.
In LPS, only Windows devices come with Windows preinstalled. All instructional and much of the productivity work of the District is completed in Google Workspace tools. Please keep this in mind if you find yourself sharing materials with certificated staff or students.
 Adobe Creative Cloud
There are some roles in LPS that need access to Adobe Creative Cloud apps. If you are one of these people, use the Creative Cloud Installer found in Filewave to download the individual apps you need, or contact the Help Desk for assistance. Then use the instructions below to sign into them.
Web Browsers


LPS currently supports Google Chrome and Firefox. Teachers are recommended to use Google Chrome when working with students.
Microsoft Edge was the default browser on your laptop. During your laptop training session, the shortcut was removed
LPS Portal
Great news! The LPS Portal can favorite tools you use most frequently. Instructions, including a short video overview, can be found on this page.
Zoom Setup
Instructions for setting up the Zoom desktop client can be found here. Be sure to follow the steps closely and sign in with the SSO option, or you may end up in a non-LPS account.

Malware & Spyware
Is your browser home page being blocked? When you search the web does it take you to a search engine you didn’t choose? Do you see pop-up windows whenever you launch your web browser?
If you answered “YES!” to any of these questions, your frustrations may be the result of malware or spyware. Please contact the LPS Help Desk at x1735.)
Google Chrome
![]() There are many good web browsers, and we have installed Chrome, Firefox, and Safari (Mac) or Edge (Windows) on your machine so you can use whichever tool meets your needs in a given situation. However, we are encouraging teachers to use Google Chrome as their default browser for a number of reasons.
There are many good web browsers, and we have installed Chrome, Firefox, and Safari (Mac) or Edge (Windows) on your machine so you can use whichever tool meets your needs in a given situation. However, we are encouraging teachers to use Google Chrome as their default browser for a number of reasons.
If you are new to Chrome, you may not realize there can be an extra click when printing. This page will show you the “Print using system dialog…”
If you are struggling with an issue related to Chrome (password saving, broken login, etc.) or are interested in ways to make your use of Chrome more elegant, this LPS page may offer the ideas or solutions you are seeking.
For general information and help using Chrome, visit the Chrome Help Center, or contact the LPS HelpDesk.
Sync Your Chrome Data
Google Chrome users should make sure their LPS profile is syncing. Follow these simple steps to sign in with your LPS Google Account:
- At the top right of the window, click the
 button (or the image you’d previously selected for your account).
 - Click Sign in to Chrome (or Turn on Sync if you’d been previously synced).
- Enter your LPS Google account address (username@class.lps.org) and click Next.
- Sign into the LPS Portal on the next screen.
- Verify it is your @class.lps.org account and click Continue.
- Select Link Data.
- Select Yes, I’m in.
Bookmarks, history, passwords, and other settings saved with your account will automatically sync.
Additional Software
FileWave
 Depending upon your role in LPS, you may have a reason to have software applications on your laptop that other LPS employees may not need, or be licensed to install. In an effort to get the right software to the right staff members, LPS offers a way to install your own software, on your LPS computer, using a tool called FileWave.
The software available through this tool is curated by Lincoln Public Schools. You will only see the software that LPS makes available to optionally install on your LPS laptop.
Software Updates
 LPS computers receive software updates, security patches, anti-virus definitions, and inventory updates from FileWave on a regular basis. You are expected to run all available updates as soon as possible (without impacting instructional time.)
Set up Multiple Displays
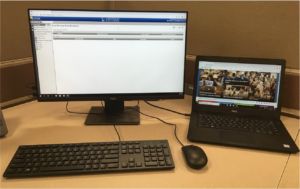
By default, your laptop is set for duplicate display projection, meaning your laptop screen and your second screen will have the same image displayed on each of them. To increase your work space and have each screen display different windows, press and hold the Fn and F8 key on your keyboard and then select Extend.
