File Management

"Cloud First" Storage Strategies for LPS Staff

LPS users are encouraged not to keep files on their laptop or desktop computer. There are many reasons for this. Some major considerations:

  • After July 18th, 2021, LPS will no longer be backing up files from your laptop automatically.
  • Computer hard drives are generally reliable, however, they have become less “repairable” when damage occurs.
  • Files containing privileged work-related data kept on your computer are a potential security risk for the district if it is lost or stolen. Files kept in Google Drive are secured and accessible by you and those with whom you collaborate.
  • Required software updates demand more free space on computers.


Upload files to the cloud

1. Keep Your Data in the Cloud

LPS provides as much storage space as you need for file storage through Google Drive and other tools. For many reasons we recommend taking advantage of the secure “cloud” based nature of Google Drive for all of your file storage needs. 

Downloads, Documents, and Desktop Folders

Consider this; if you downloaded a file once, you can probably download it again if needed. Users should not use the Downloads folder on their computer as a storage location. Other locations where files often end up on your computer are the Documents and Desktop folders.

If there are important files anywhere on your computer, it is important that you move them to your LPS Google Drive for proper storage before deleting them. To do this:

  1. Open the Chrome web browser on your computer and navigate to your LPS Google Drive via the LPS Portal
  2. Select any important files from your computer and drag those files into your LPS Google Drive.
  3. Once you can see the important files appear in Google Drive, drag all of the files from your Download folder into the Trash. (If dragging the files is proving difficult, simply open the Edit menu and Select All. Then, click File and Move to Trash.)
  4. Empty your trash, as described below.

About Google Drive

Your @class.lps.org Google account, Drive provides you with as much storage space as you need. You should keep as many of your work related files in Drive as possible. After they are securely uploaded to Drive, you can safely delete them from your laptop (remembering to empty the trash when you are done).

Within Google Drive, users can upload most file types into Drive for storage. 

While using the Google Chrome browser, users can open up Google Drive and simply drag individual files or entire folders from their computer right into Google Drive, as shown above.

Settings / MS Office File Conversion

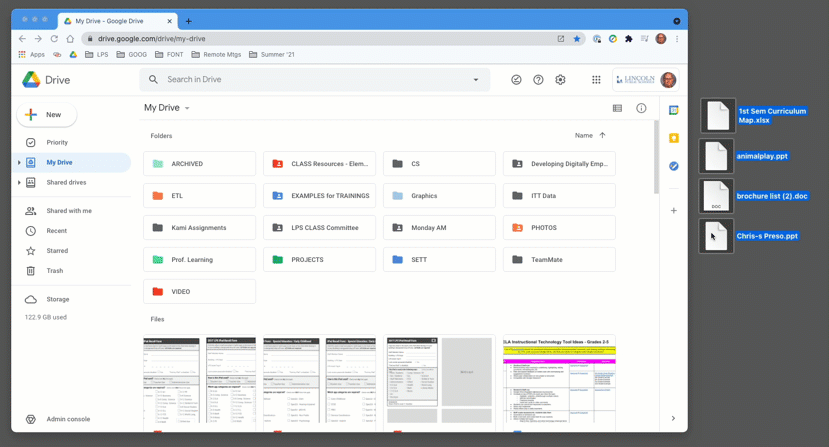
Whether you’re dragging files directly into Google Drive or using the File/Folder upload option, you can automatically convert like-files if that would be helpful moving forward. This means your Word documents would automatically convert to Google Docs, PowerPoints to Slides, etc.. To turn this function on, in the top-right corner of Google Drive, click on the Gear Google Drive Settings icon > Settings > Convert Files on Upload. 

If you are only using Drive to store files without editing them in Google Docs, then you may not want to change this setting. However, most of us want to edit the file online and collaborate with others. 

Media Files

Apple tends to help you store Movies, Music, and Pictures in their special folders on your Mac. Be sure to check those folders for any files that can be moved to LPS Cloud storage locations. For example:

Pictures

Staff members have access to Google Photos from their LPS (@class.lps.org) Google account. You can find it in the LPS Portal. Google Photos offers one of the best cloud based photo management environments available today.  Learn more about it here.

You can drag & drop any photos stored on your LPS laptop into your LPS Google Photos account before deleting them from your computer.

Students do not have access to Google Photos.

Movies

You can move video files to Google Drive, however LPS uses a tool called MyVRSpot to manage the storage and sharing of video content. Learn more about MyVRSpot here. It can be found in the LPS Portal.

You can upload any movies stored on your LPS laptop into MyVRSpot before deleting them from your computer.

Music

You can upload any music files stored on your LPS laptop into EITHER Google Drive or MyVRSpot before deleting them from your computer. 

Student Data Security

Take care to never store LPS work product in non-LPS storage solutions such as Apple iCloud, personal Google Drive, Dropbox, etc.

2. Delete Files

The truth is that we generally don’t need to keep most of the files we tend to keep. We could probably delete a lot of them. Occasionally, it’s healthy for all users to go through files and folders to clear out old, outdated, or unneeded files., then delete them from your computer. 

Empty Your Trash

Files in your trash are still taking up space on your computer, and open to security concerns. You should regularly delete the files from yoru trash.

There are a few different ways to empty your trash. One simple strategy is to click the Trash icon in the Dock of your Mac. In the window that appears, click the Empty button in the upper-right corner of the window. In the warning message that appears, click Empty Trash.

Another strategy would be to right-click on your trash and select Empty Trash.

NOTE: Once the files are emptied from your Trash, they’re deleted forever. Please make sure you aren’t housing needed files in your Trash. 

30 Day auto-delete of trash

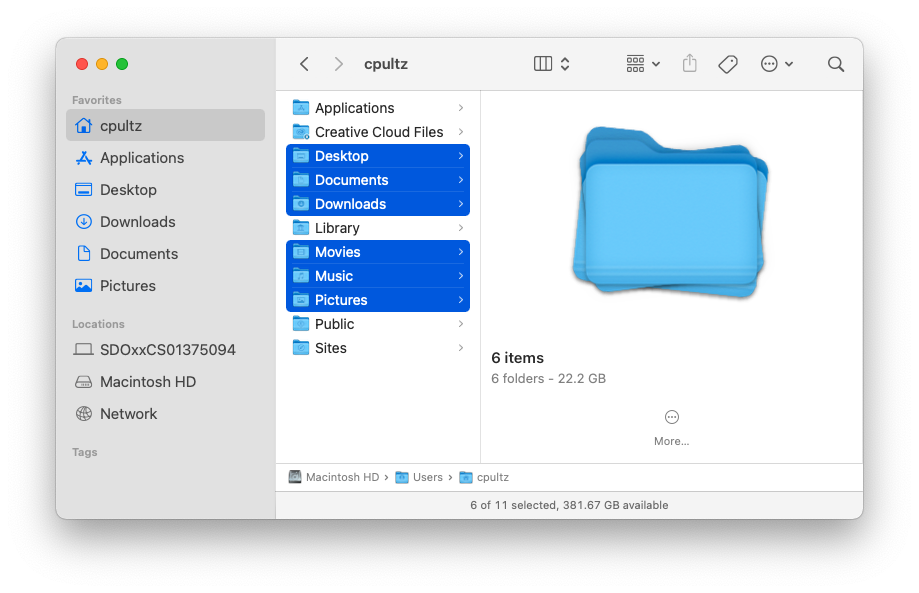
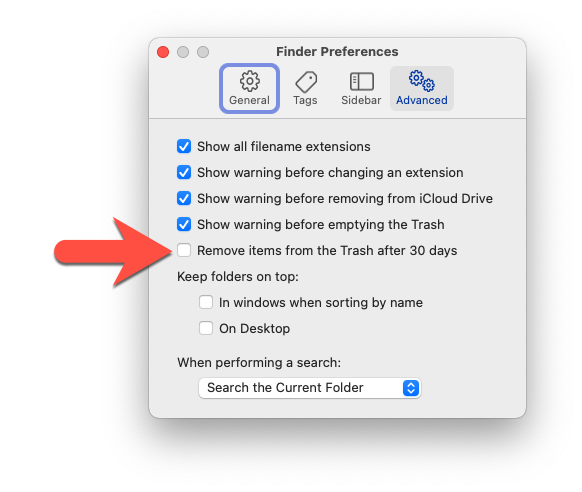
TIP: If you look in your Finder/Preferences, you have the option to have the Trash to auto-delete files after 30 days. A great idea!

Other Strategies and Tips

Personal Files

LPS allows for incidental personal use of your staff laptop as long as it does not interfere with your ability to use the device as intended for work purposes. Incidental implies that the use is not permanent. Your personal photos, videos, and other files should be kept on non-LPS devices, especially if there are so many of them that they are impacting your needed storage space.

NOTE: Never move LPS work to non-LPS storage, as it is likely not FERPA compliant.

Further, we offer a reminder that for legal reasons, you are cautioned against storing personal media (photos, video, documents) on LPS devices or storage locations. In the event of litigation or public records request, all files and logs on district computers are subject to discovery. 

Likewise, staff should not store work files on personal devices or storage locations.

Locate large files that are taking up space on your computer

Sometimes a handful of large files (movies, music, application files) take up large chunks of space on your hard drive. These files can often be deleted or moved to a cloud-based space (Google Drive, MyVRSpot) in order to recover needed space.

It can take a significant amount of time searching through all folders on your computer looking for large files. Luckily, MacOS makes this process a little easier. To start seeing how storage is used on your computer, click on the Apple in the top-left corner of your screen and select About this Mac. From here, click on the Storage tab, and then the Manage button.

121GB File Space Available

While looking at the Manage screen, you’ll see many recommendations and areas to scan for large files. Pay special attention to any of these files that can be selected and moved to the Trash with the Delete… button at the bottom of the window. Remember, hard drive space is not actually recovered until you empty the Trash, as described above.

Notice how many files you have listed in iTunes, Photos, Mail, and other areas. While it’s possible these are for teaching needs, it’s also possible these are personal files and could be moved off of the computer to a personal storage space (thumb drive, external hard drive, or personal cloud storage). 

Managing large files on your computer