Make an Audio Recording

 Staff using macOS may record audio in the default QuickTime Player tool provided with the laptop.
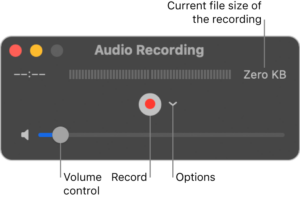
- Launch the QuickTime Player app, found in the applications folder of your Mac.
- In the QuickTime Player app, choose File > New Audio Recording.
- Click the Record button to start recording.
- Click the Stop button when you’re done.
- Choose File > Save to save and name the recording.
For more information about the recording quality options available, visit the Record audio in QuickTime Player on Mac resource available from Apple.
After you have an audio recording, you can trim or split your audio recording into clips, rearrange the clips, or add other audio clips. See this resource for more info: Split a movie into clips.
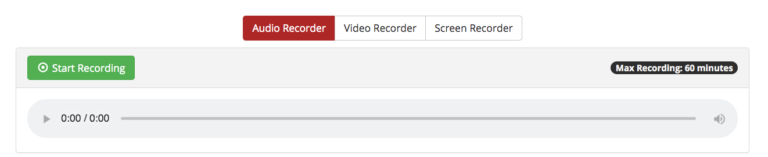
 Soundtrap is a web-based tool used to create and edit dynamic audio recordings, and is available to LPS teachers and students via the LPS Portal. Though it specializes in multi-track rhythmic audio, as well as podcast creation, Soundtrap can also be used to record and edit voice narration. Teachers might use this tool to capture themselves reading a book, dramatic script, or some other piece of text where a visual aid is not necessary. Follow the instructions below to learn how to create your own audio recording in Soundtrap!
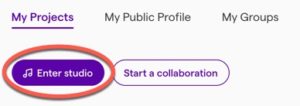
- Log in through the LPS Portal.
- From the home screen, click Enter Studio.
- You will be prompted with the option to create either a Music project or a Podcast. Even though you may not be trying to create either of these types of projects, they both have great features for capturing and editing a voice recording. For a standard voice recording, choose Podcast. (Note: this selection is slightly more suitable for a voice recording because it’s default audio levels are geared toward a spoken voice. It also allows you to create a transcription of the audio text.)
- Create a title for your project by clicking the pencil edit button (found at the top of the page, to the right of the default title, Untitled Podcast).
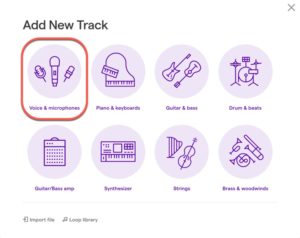
- Select Add New Track in the left-hand column, and then Voice and Microphones.
- If it is the first time you are recording in Soundtrap, a pop-up window may appear and prompt you to allow Soundtrap to have access to your microphone. Click Allow.
- Define your Input. Toward the bottom of the page, on the left side is a dropdown menu where you can select from a number of devices.
- Your built-in microphone will work just fine, but if you prefer to record from a pair of headphones, be sure to select that device in the dropdown menu (its name will depend on the manufacturer’s settings for that device).
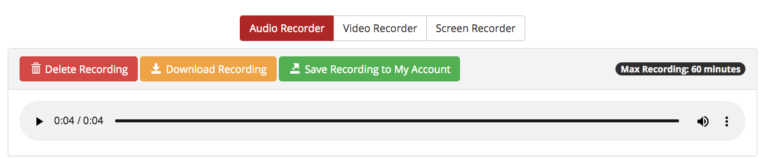
- Once you are ready to record, click the red circle Record button at the very bottom of the page. Press Stop when you are finished recording.
- To playback the audio, make sure the purple marker is at the beginning of the timeline, then click the triangular “play” icon on the control board at the bottom of the page
- Pressing the Space Bar is also a helpful keyboard shortcut for both playing and pausing the audio playback.
- Keep in mind that Soundtrap does not autosave, so once you have material in the studio, be sure to click the Save button at the top of the page to preserve your work. Periodically repeat this step as you make changes to the recording.
![]()
- Near the bottom-left-hand corner of the page is a Transcription dropdown menu where you can select the audio recording to transcribe into text. Find a track among the list—if you only have a microphone track, that will be the only item in the list. Select it and in the window that pops up, click Confirm.
- Depending on the duration of your recording, the transcription process may take a moment.
- Take a moment to review the text and locate any errors that the system has made. You may correct errors by highlighting the transcript, right-clicking the text, and selecting Text Correction.
- Though you cannot export the transcription into a text file, per se, you can copy and paste it into another document. To do this, act as though you are going to edit the text (highlight the entire transcript, right click and select Text Correction). Now that the format has changed to text editing, highlight the transcript once more, right click, and select Copy. Paste the content into a word processing document or other text file.
- Slight formatting edits may need to be made once pasting the text into a new document. For instance, if the time-codes are not helpful or important for your purposes, you may simply delete them.
The resulting transcribed text is helpful to use for accessibility purposes. You may choose to upload it with your media so that students may also access it.
Updated July 10, 2025
