Record Yourself Delivering a Screencast
![]()
WeVideo is a great tool to create and edit instructional videos. It has the capability to record your screen and webcam at the same time to produce a picture-in-picture style video. To learn how to create this type of video in WeVideo, follow the instructions below and watch the tutorial video.
- Log into WeVideo from the LPS Portal and, from the dashboard, select Recording under “Create New”.
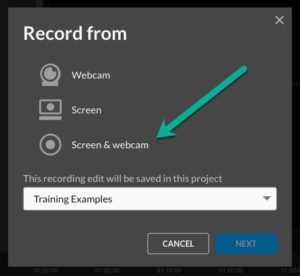
- You will be prompted with the options to record from your webcam, on your screen, or both from your webcam and on your screen. Select the last option, Webcam & Screen.
- You may need to grant WeVideo access to your microphone and camera, as well as to store files on your device. Click Allow.
- If, for some reason, you did not receive this pop-up but still need to allow access, you can also change these settings by going to your System Preferences, selecting Security & Privacy, and adjusting the access for your microphone, camera, and files/folders.
- WeVideo will then ask you which camera and microphone you would like to use for your video and audio production. Unless you have a different device you would like to connect and use (such as a pair of headphones with built-in microphone), select FaceTime HD Camera and Default – MacBook Air from the options available. Click Next.
- Identify which aspect of your screen will be captured: the entire screen, an application window, or a particular Chrome Tab. Select the view that best suits your purposes, then click Share.
- After a three second countdown, WeVideo will begin simultaneously recording both from your webcam and the activity on your screen.
- When you are finished recording, press the blue Stop Sharing button at the bottom of your screen.

- You will then see a preview of both videos, at which point you can play them back at the same time and review their content.
- If you are not satisfied with the recording, click Record Again in the bottom-left-hand corner of the window. If you are satisfied with the recording, click the blue Save button. Your two videos will then appear in the My Media tab in the top-left window of the editing page.
- Once you have saved, you should see your two videos already in your timeline, ready to either edit or export.
Once you are finished editing and finalizing your video, click the blue Finish button in the upper-right-hand corner of the page to begin the exporting process.
- If you have not already created a title for your export, WeVideo will prompt you to do so at this point.
- There are several options to define the quality of your export. For the purposes of a picture-in-picture video, you will want to ensure that the Video with Audio option is selected. Choose the resolution that you would like your video to have. SD is standard quality—it will export faster and create a smaller file size that is easier to upload to your destination. HD is a great option for online videos—it may take slightly longer to export, but results in a slightly larger file size.
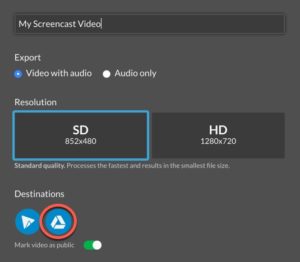
- To export and share your video directly to your Google Drive account, ensure that the triangular Drive icon is selected. You may be prompted to connect your WeVideo account to your Google account and to allow WeVideo to access your content. Be sure to sign-in through your username@class.lps.org account. Finally, click Export. It may take several minutes for the export to be completed, but once it is, WeVideo will generate a link that you can use to share your video. Then, if you go to your Google Drive account, you will see a WeVideo folder with your video inside it.
Sharing to Google Classroom
Adding you video into your Google Classroom course from your Google Drive is a great way for students to access the content. Effective ways to do this include attaching the video file as an announcement to the class, or creating a piece of Material in Classwork. To learn more about adding content to your Google Classroom, go here.
Updated July 16, 2025
