</strong></p></span>")
Backup Strategies
Consider your loss of data
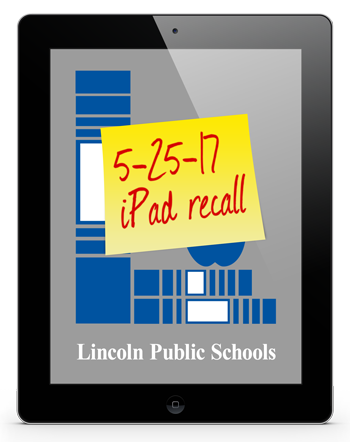
To be clear, when the iPads is returned the device will have been erased. It will be “like new.” This is unlike the teacher laptop process of recent years in which your new laptop had all of the files from your old laptop, in all of the same places. In the case of the iPad, any files (photos, videos music, notes, etc.) or other data that were on the device will no longer be there when you get it back.
Following are a number of helpful resources and strategies about saving or backing up any critical information on your iPad prior to turning the device in.
Disable Passcode
Disable Passcode
Before turning in you iPad for reconfiguration you must disable the Passcode if you had it enabled.
On the iPad:
- Go to the Settings app
- Go to Touch ID & Passcodes
- Enter the Passcode
- Select Turn Passcode Off
- Select Turn Off when the warning message appears
- Enter the Passcodes
The passcode is now disabled.
Find My iPad
Disable “Find My iPad”
Before turning in you iPad for reconfiguration you must disable the “Find my iPad” feature, if you had it enabled.
On your iPad:
- Go to the Settings app
- Tap iCloud (If you do not see iCloud listed, tap on your Name/Profile. iCloud will be listed there.)
- Tap to turn off Find My iPad.
- You will be prompted to enter the iPad’s passcode and/or your Apple ID password. (This is different than your LPS password.)
For additional information on disabling “Find My iPad,” visit Apple’s ‘Remove your device from Find My iPhone‘ support page.
If you’re having issues because you have forgotten your Apple ID password, use the steps provided here to reset it and regain access to your account.
Photos & Video
Photos & Videos
Some staff may have used the iPad to take photos or videos. You can tell whether or not your iPad has photos or videos stored on it by opening the Photos app. If you see any photos & videos within the Photos app, you will lose them during the recall if you do not act to save them.
There are MANY avenues a person can take to backup the photos & videos on an LPS iPad. We recommend the following three strategies, in this order:
- Use the Google Photos app, if it is installed on your iPad.
If it is not installed on your iPad… - Use the Google Drive app, if it is installed on your iPad.
If it is not installed on your iPad… - Use the Chrome or Safari app to access the Google Photos web page.
Guidance for using each of these three options is provided below.
Option 1: Google Photos app
If you have the Google Photos app installed on your LPS iPad, this is going to be the simplest (and best) avenue for backing up your photos and videos from the iPad.
You will want to be signed in to your LPS Google account (@class.lps.org) where you have unlimited storage space for backing up images and videos. If you are not already signed into that account…
- Open the Google Photos app .
- At the top left, tap Menu .
- Select the triangle to the right of the username that is currently signed in to Google Photos
- Select Manage accounts
- Select Add account
- Use your full
username@class.lps.orgaddress with your LPS password
To start backing up images from your iPad to your LPS Google Photos account
- Open the Google Photos app.
- At the top left, tap Menu.
- Select Settings > Back up & sync.
- Switch on or off.
If you see a message asking to allow the app to access your photos:
- Open the iPad’s Settings app > tap Privacy > Photos.
- Switch Google Photos on.
Google Photos will upload your photos as quickly as possible given your current internet connection’s speed. If you are on the LPS network, this process will go quickly, depending upon the number of images and videos you have to backup.
Are my photos backed up?
Verify that the photos are backed up by visiting the URL photos.google.com from another computer. Every photo and video you see at photos.google.com is backed up from your iPad.
Learn more about what is possible within the Google Photos tool.
Option 2: Google Drive app
If you have the Google Drive app installed on your iPad, you can use it to automatically back up and sync your photos and videos from your iPhone & iPad to Google Drive with Auto Backup, or you can chose to select individual photos and videos to upload.
You will want to be signed in to your LPS Google account (@class.lps.org) where you have unlimited storage space for backing up images and videos. If you are not already signed into that account…
- Open the Google Photos app .
- At the top left, tap Menu .
- Select the triangle to the right of the username that is currently signed in to Google Photos
- Select Manage accounts
- Select Add account
- Use your full
username@class.lps.orgaddress with your LPS password
Turn Auto Backup on
- Open the Google Drive app.
- Tap the Menu icon in the top-left corner of the screen.
- Tap Settings > Photos.
- Tap Auto Backup.
- Next to “Auto Backup,” turn it On.
Upload individual photos & videos to Google Drive
- Open the Google Drive app.
- Tap the Add button in the bottom-right corner (+) .
- Tap Upload.
- Tap “Photos and Videos” to find and the files you want to upload.
- Tap on one or more items that you wish to upload to Drive
- Tap Upload.
Option 3: Upload to Google Photos via Safari or Chrome app
Uploading from iPad to Google Photos via the web interface
If the Google Photos and Google Drive apps are not installed on your iPad, your next best option will be to use the web interface.
- Launch the Safari app on the iPad
- Go to the URL accounts.google.com
- Sign in to your LPS Google account (
@class.lps.org)
If you are presented with the sign in screen for another Google account, click the link below that says “sign in with another account” - Once signed in, go to the URL photos.google.com.
- If you are asked whether to download the app or continue, choose continue.
- In the top right corner of the Google Photos page, you will see UPLOAD. Press that.
- Select “Photo Library”
- Select one or more images and videos from your Photo Library by tapping on them.
- Select “Done”
If you are asked about the upload size, both “High Quality” and “Original” are fine. Choose either and press Continue.
Google Photos will upload your photos as quickly as possible given your current internet connection’s speed. If you are on the LPS network, this process will go quickly, depending upon the number of images and videos you have to backup.
Are my photos backed up?
Verify that the photos are backed up by visiting the URL photos.google.com from another computer. Every photo and video you see at photos.google.com is backed up from your iPad.
Learn more about what is possible within the Google Photos tool.
Music
Music
If you use the iPad to access music, it is important you ensure you have access to this music from somewhere else before turning in your iPad. Any data (including music) on this iPad will be erased. There is more than one way to do this. One of these ideas may fit your situation better than another.
 Music via Streaming Services (Pandora, Spotify, Google Music, etc.)
No action is necessary, but depending on the service, you might consider logging out of the app. Make sure you know your username & password so that you can sign in again when you get the iPad back.
Music synced to your iPad from your computer via the iTunes app
If you had music on your computer and used the iTunes app to sync it to your iPad with a USB cable, make sure that the music is still available on your Computer. You likely do not need to take any action, unless the music is NOT found in iTunes on your computer. In that case, you will want to follow these steps to sync the music from your iPad to your computer.
- https://support.apple.com/en-us/HT201253
Music Purchased in the iTunes Store
If you used the iPad to purchase music from the iTunes Store you may need to transfer your iTunes Store purchases from the iPad to a computer. If you did this, you would have used a personal Apple ID, which is not an LPS process. The following resource from Apple may assist you with this transfer process.
iCloud
If you have a personal Apple ID and use iCloud (NOTE: these are not LPS resources), use the following resource from Apple to ensure it is set up and syncing your music and other data appropriately.
Notes
Notes
If you have been using the default “Notes” app that comes with every iPad and want to save your notes for future access, you have a number of options for exporting a copy of that information.
-
Click to view larger
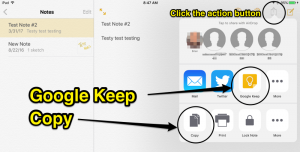
Tap the “Action” icon at the top-right of the screen. If you have the Google Keep app installed, you should see the option to “Post” your Apple Notes directly to your Google Keep account. This is the most elegant option.
If you do not have the Google Keep app installed… - Tap the “Action” icon at the top-right of the screen. Tap to Copy the note.
Switch to another tool that would be available off of the iPad, such as a Google Doc.
Paste. - Tap the “Action” icon at the top-right of the screen. If the note is a drawing, you should see the option to “Save image.” This will save the note as a photo in your iPad’s “Photos” app. Back up the photo-notes using the instructions provided elsewhere on this page.

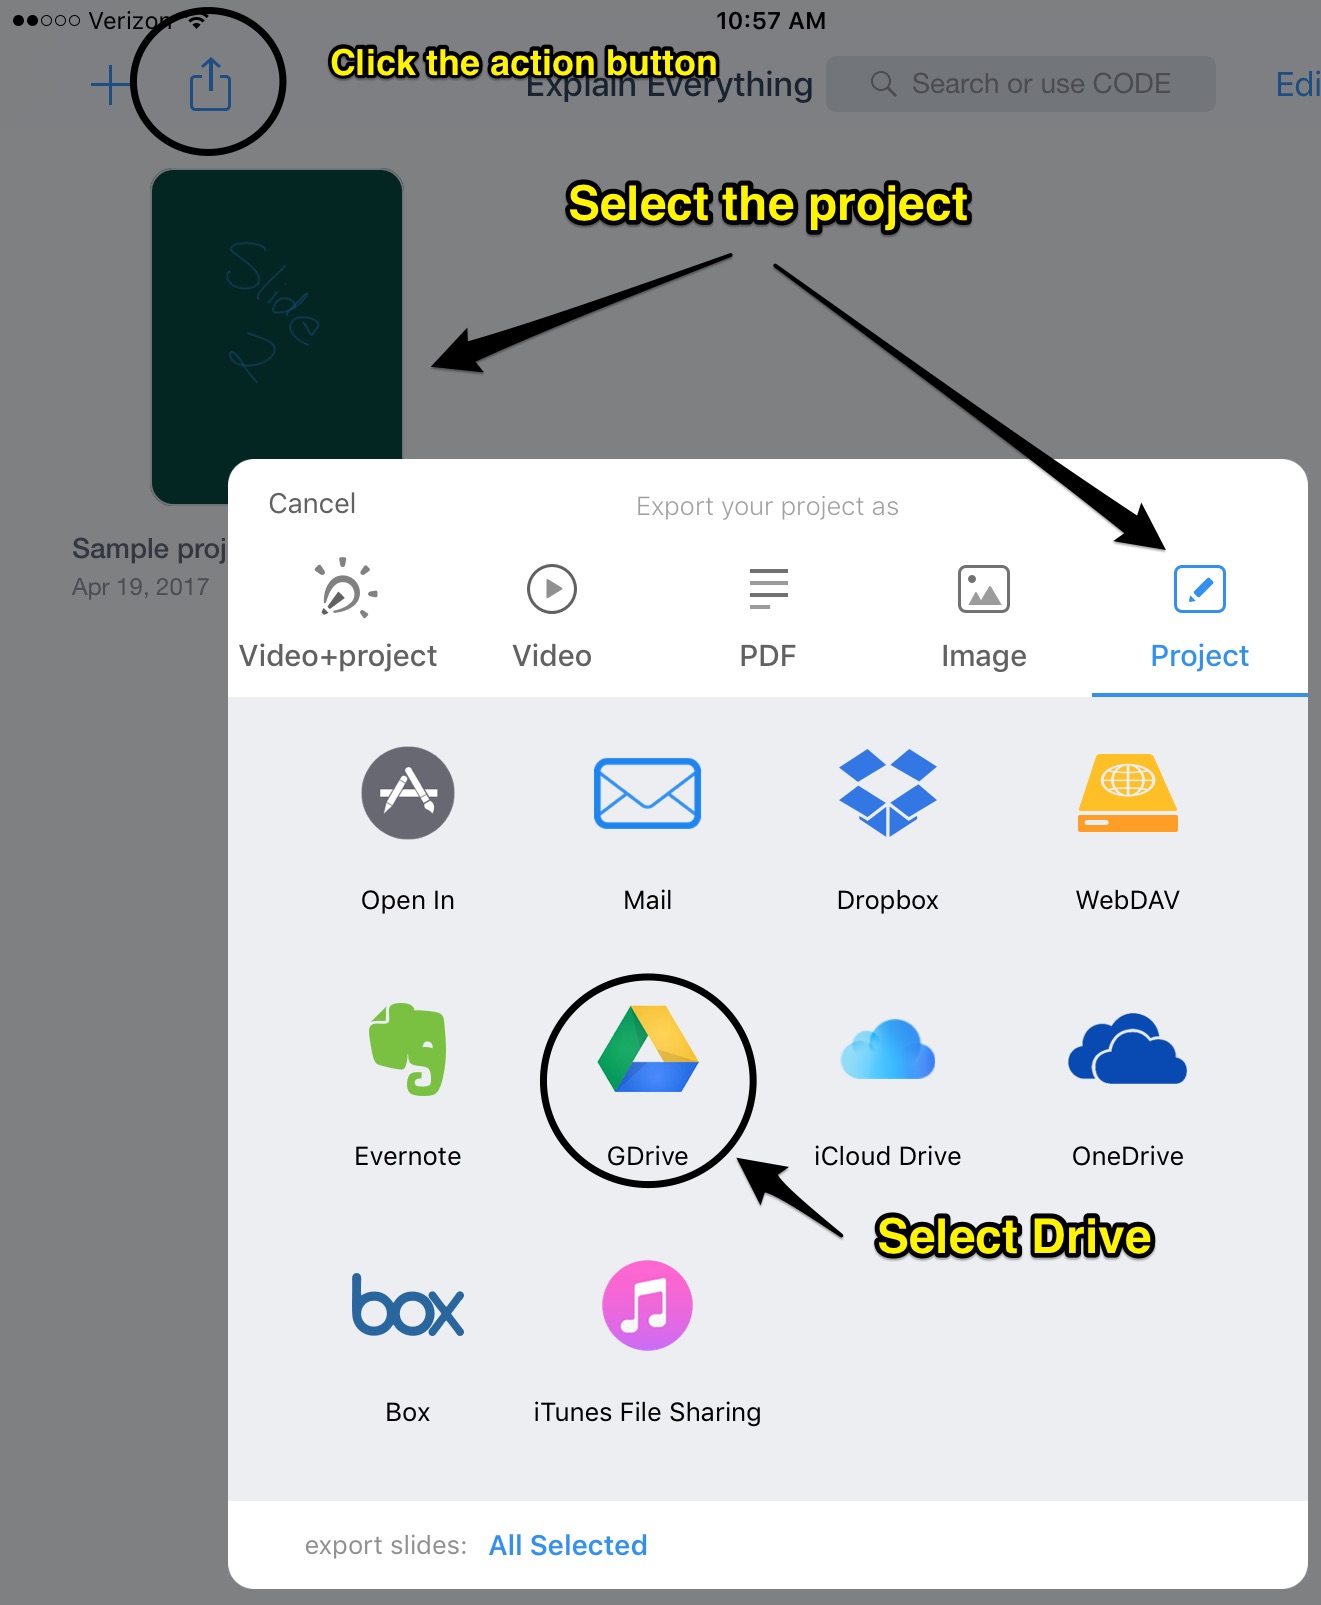
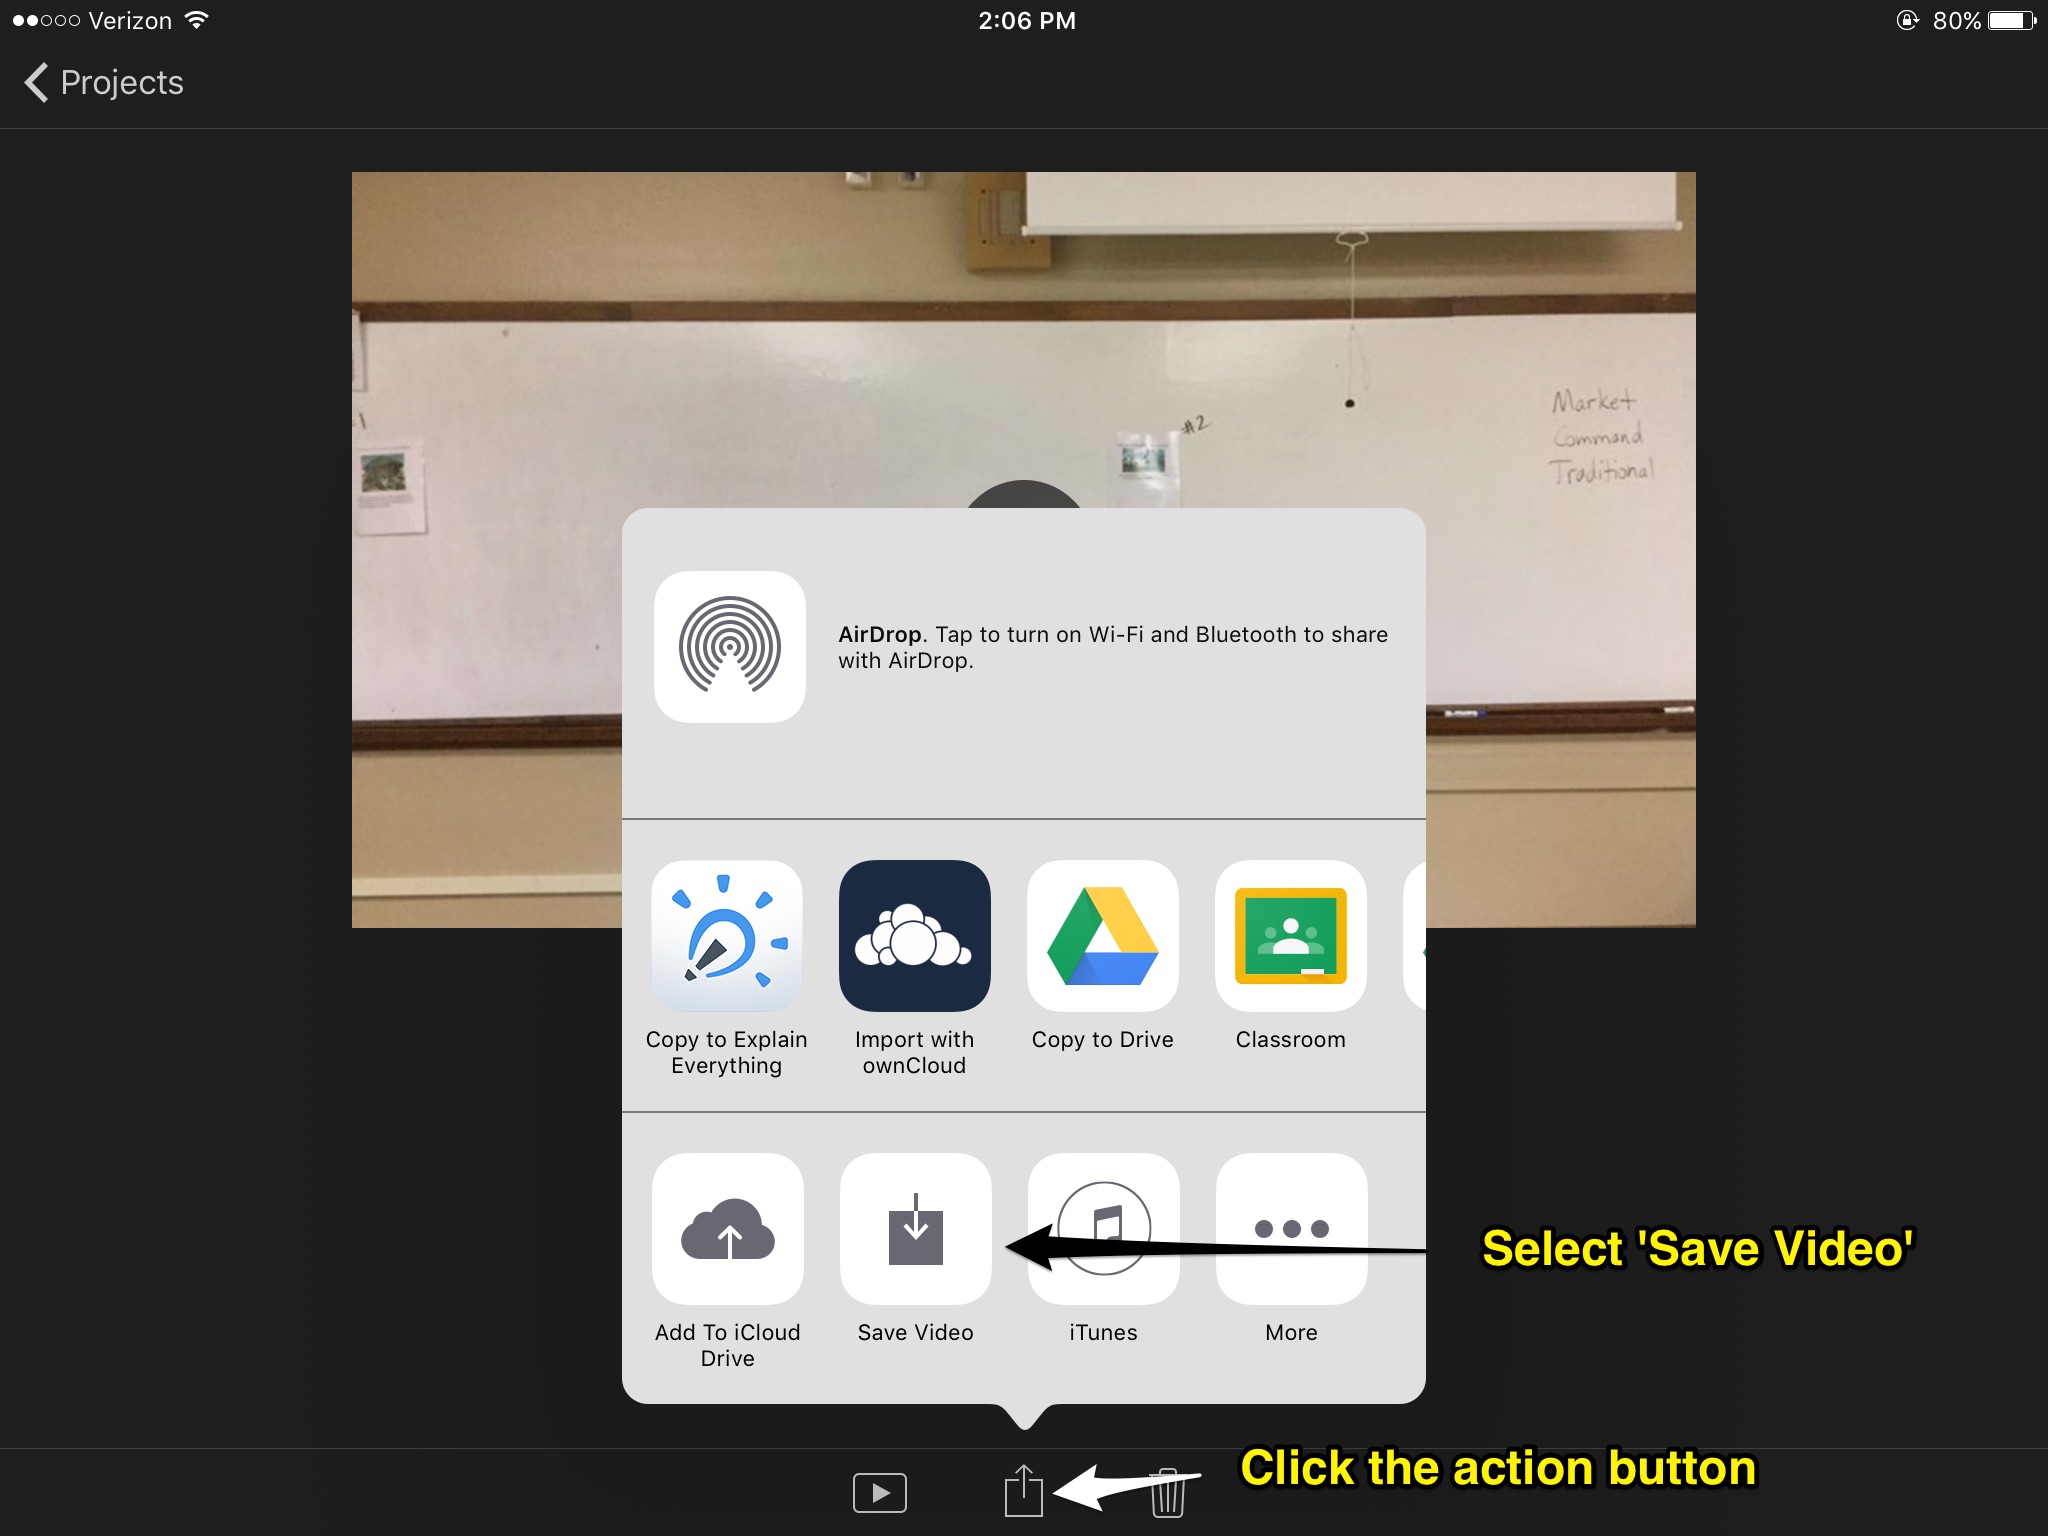
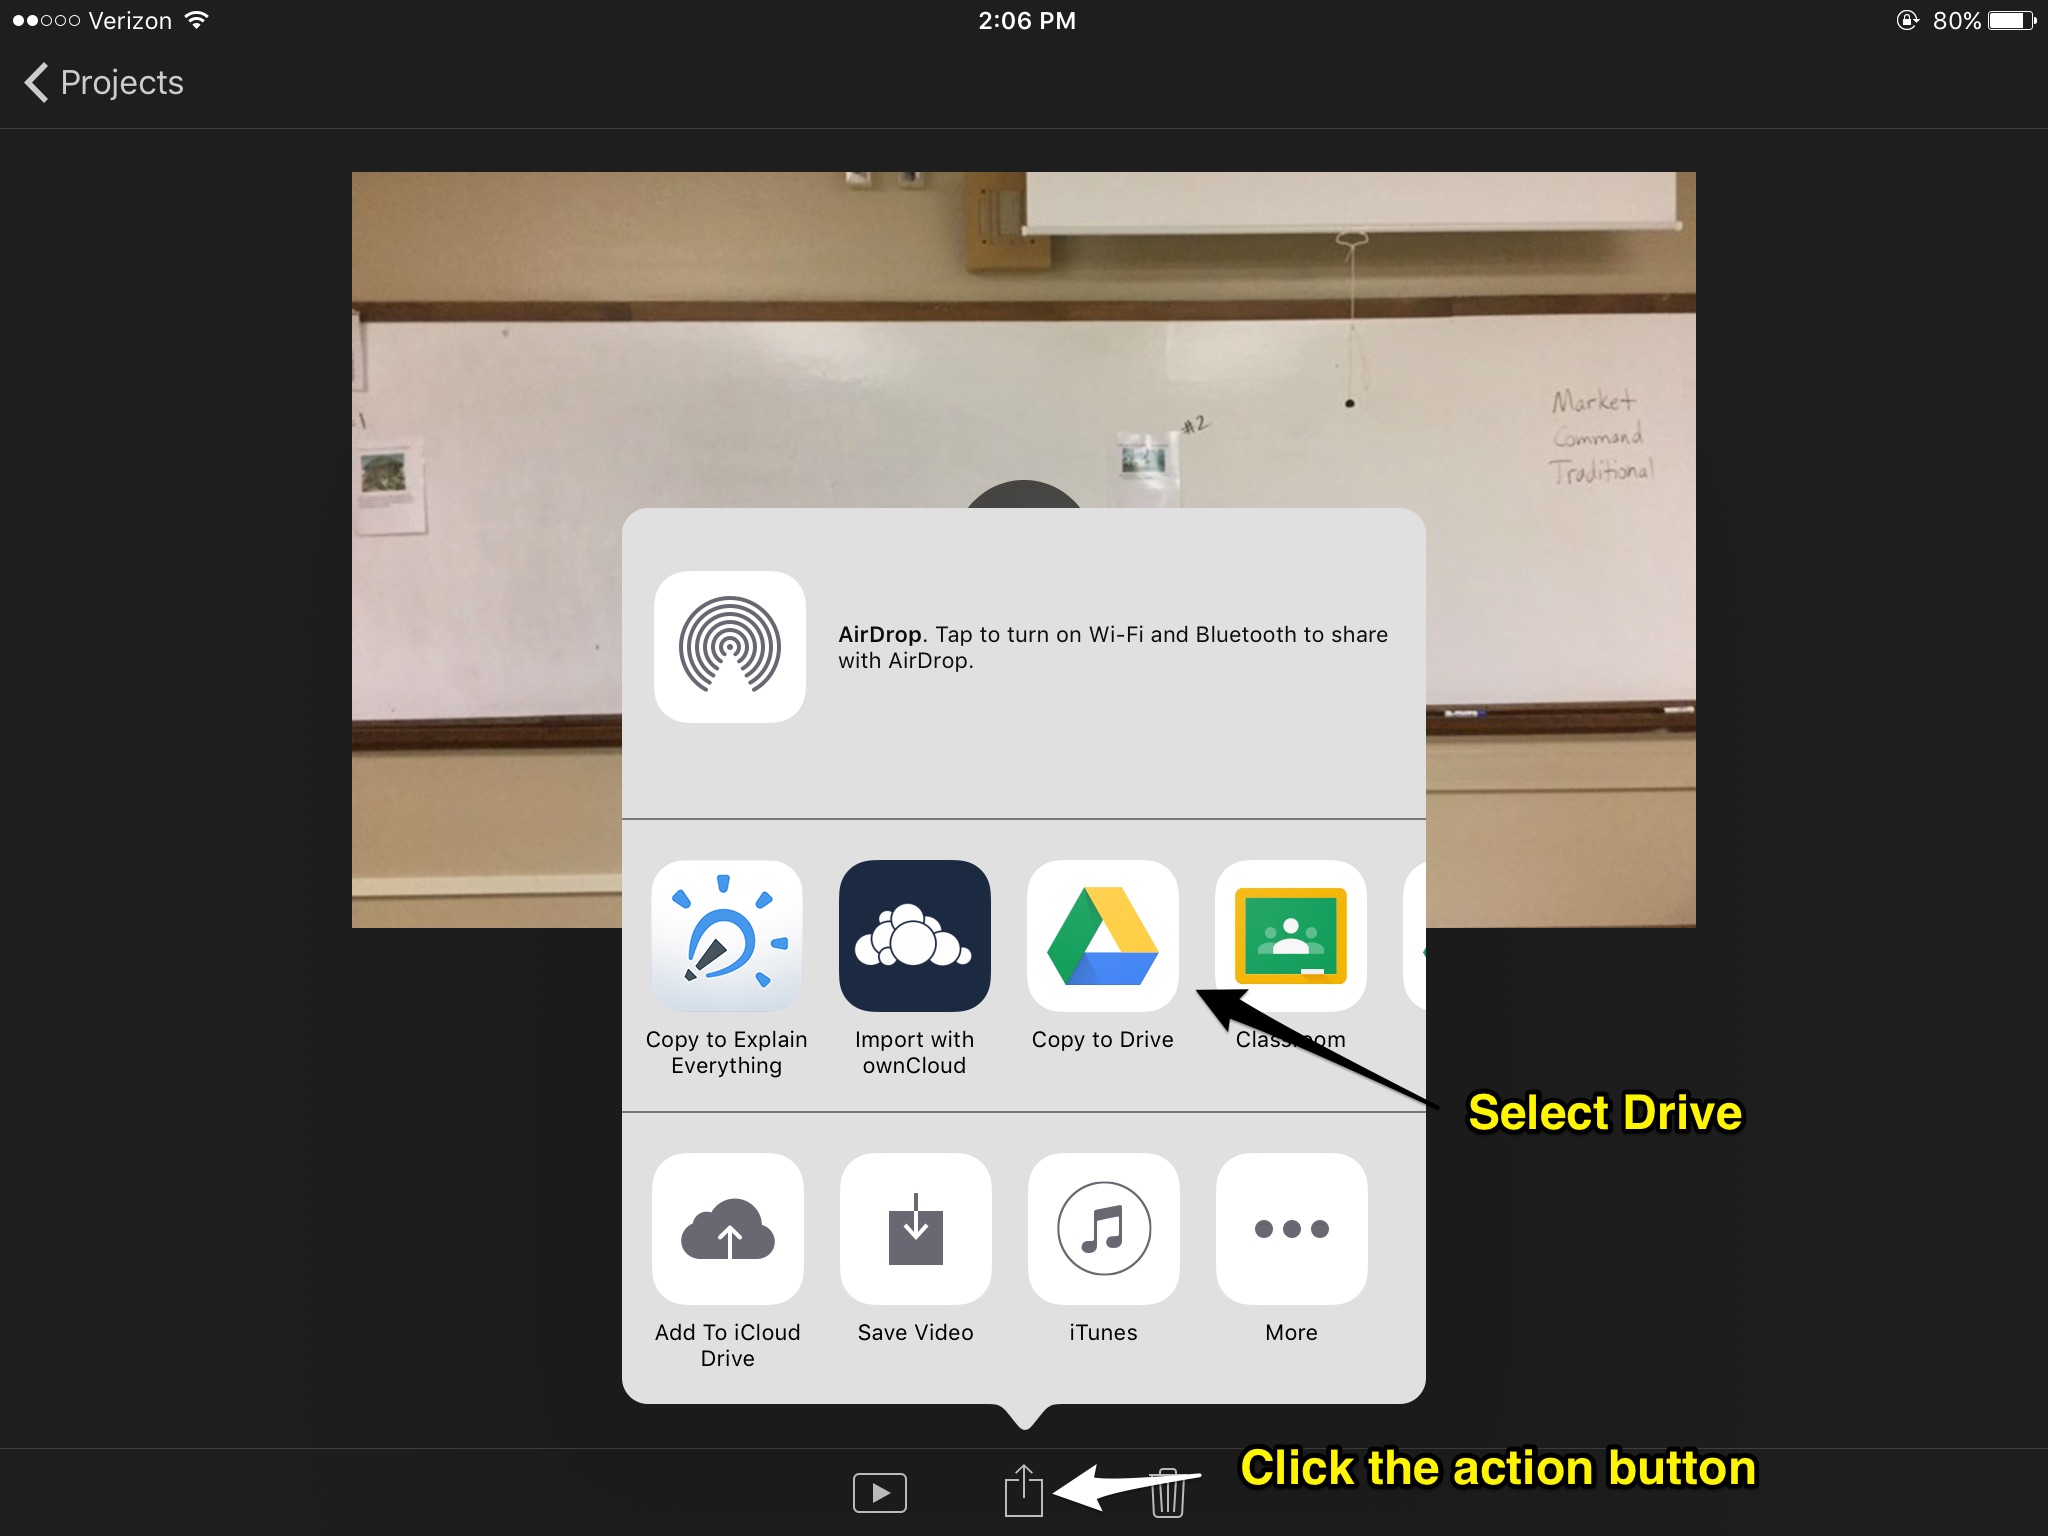
Local Files
Apps with local storage
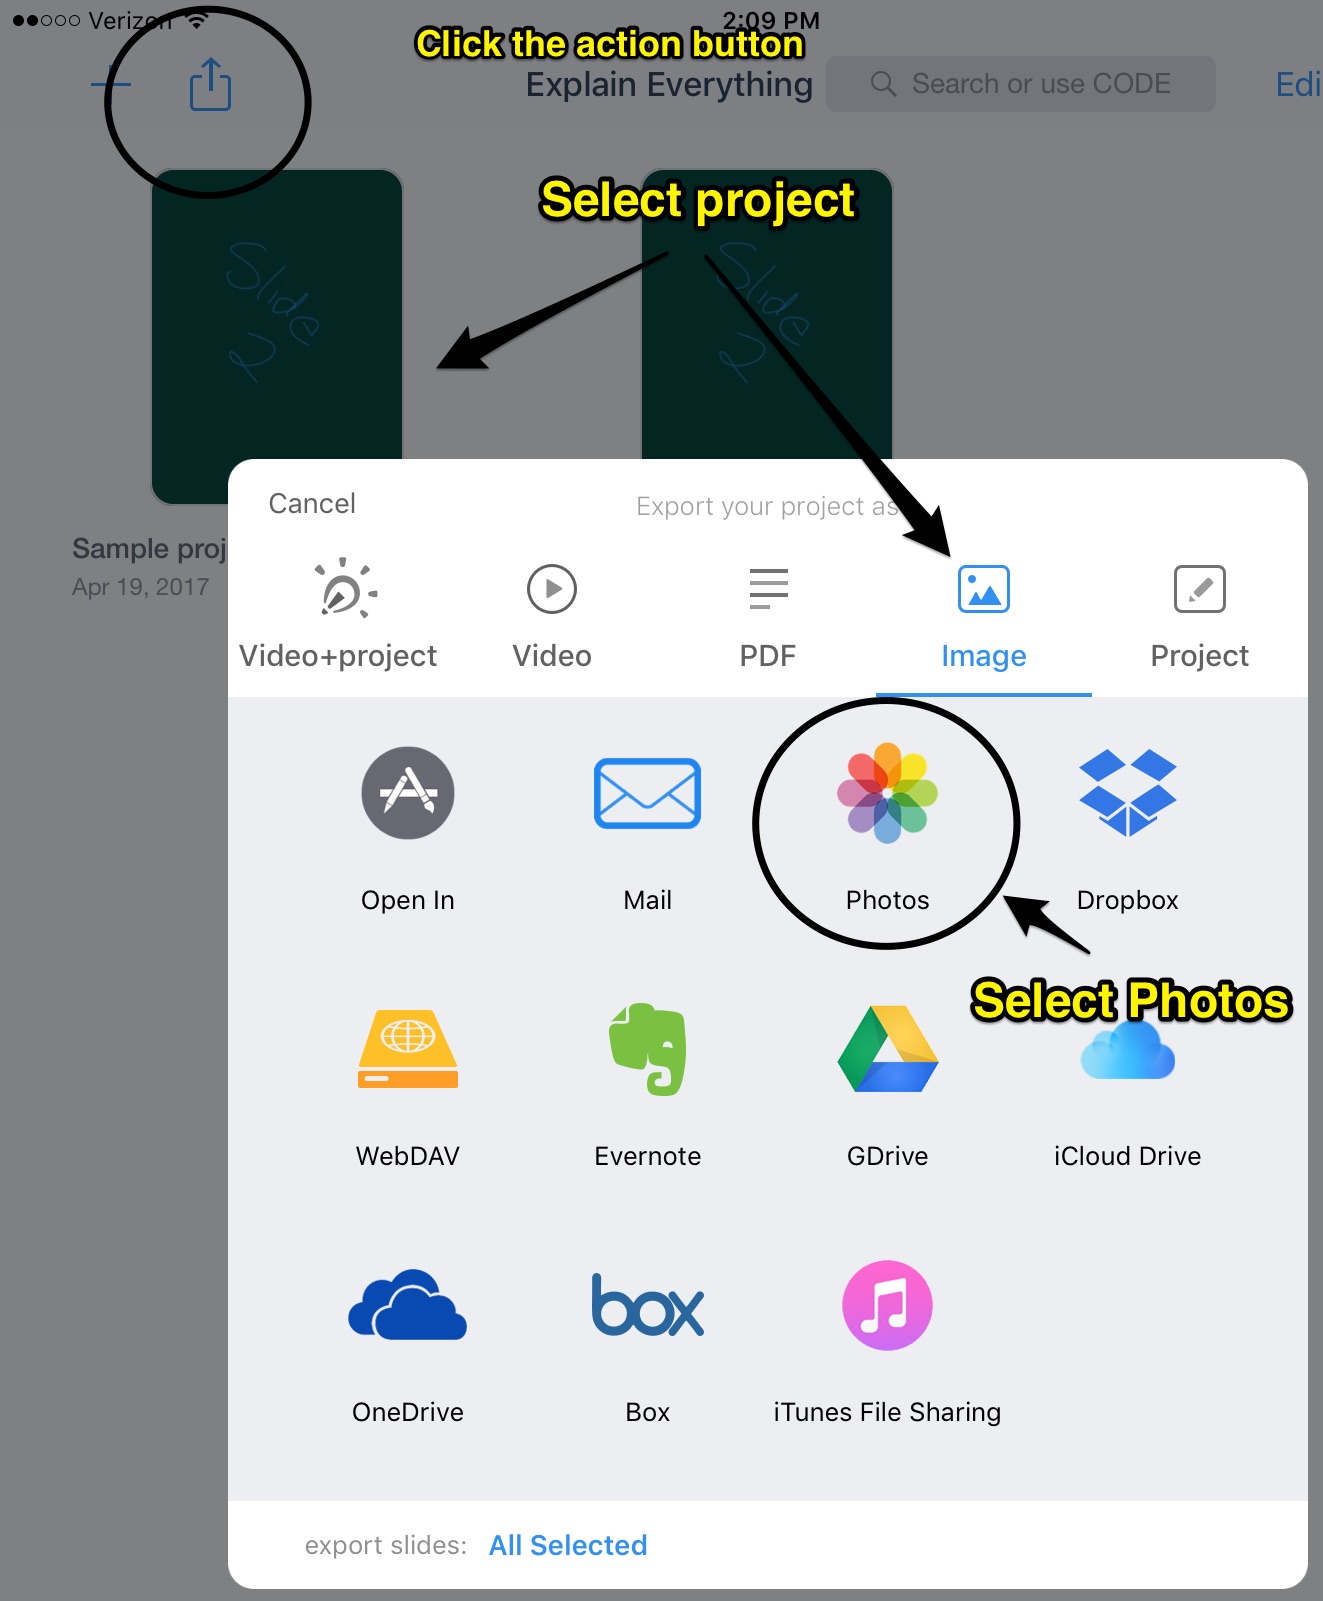
Many apps with locally stored data (iMovie, ExplainEverything, etc.) have the ability to export projects to other applications. Every app is different, but a common behavior is to be able to use the “Action” menu to save your work to Google Drive, or export it as photos. Following are some ideas.
If the Google Drive App is installed
- Tap the “Action” button
- Choose Drive as the destination
If the Google Drive App is not installed
- Tap the “Action” button
- Save the project to the Photos App
- Follow the directions (elsewhere in this resource) for saving Photos & Video

You must be logged in to post a comment.