Zoom - Video Conferencing & Team Chat

Zoom is a remote communication tool that allows a user to hold and attend meetings, as well as chat with others by using their computer or mobile device. All LPS staff members should access Zoom via the desktop application. 

PLEASE NOTE:

  • LPS staff assigned macOS or Windows laptops should use the Zoom desktop application.
  • LPS staff assigned Chromebooks should use the web app version of Zoom found here.
  • LPS staff should sign in with their LPS credentials, not a personal account.
  • In order to increase the security of the tool and promote a stable learning environment for our teachers and students LPS has applied a number of institutional controls that become default for staff. View these changes here.

Signing into Zoom

macOS/Windows 

  1. Check your Applications folder for the Zoom application and launch it.
  2. Click the Sign In button
  3. Click Login with SSO
  4. Enter “lps” for the domain (or click I don’t know my domain and enter your email address in the Find company domain by email address)
  5. Your LPS Google account (@class.lps.org) will authenticate you.  

At this point you will be able to use the client for instant messaging with colleagues, or to join a video meeting.

Chromebooks

  1. Visit the LPS Portal
  2. Click on any Google tool (Ex. Gmail) to sign in.
  3. In a new Chrome tab, vist the URL: https://pwa.zoom.us

The Zoom web client (PWA) should see your LPS Google login status and automatically sign you in. If not, you will be shown a page where you should select your LPS Google account (@class.lps.org)

Bookmark the URL listed above for easy access in the future.

IMPORTANT NOTE:
We do not recommend the use of Zoom Team Chat on a Chromebook, because messages sent to you while the app is closed will not be received and cannot be recovered. 

Mobile App

Download the App

The Zoom Workplace app is available to iPhones, iPads or Android phones. Find downloads and links to the Zoom Workplace apps here:

Sign into the app

Instructions for signing into your LPS Zoom account with the Zoom mobile apps can be found at the bottom of this resource:

Setting up your Profile

  • From the zoom.us menu at the very top of the application window, click Preferences.
  • Click View More Settings at the bottom of the window that pops up.
  • Click the Profile tab
    • This takes you to your Profile on a web page in your default browser where you control how your Zoom account works.
  • Insert a Profile picture at the top (optional).
  • Find the Personal Meeting ID. This unique number is assigned to you and stays with you for the duration of the use of your Zoom Pro account.
    • The option “Use this ID for instant meetings” should be checked (circled below). If it is not, click Edit, check the box, and SAVE.
    • The only reason you would change the Personal Meeting ID would be to possibly change it to your office desk phone number ONLY IF you have a unique office phone number that nobody else has (teachers will likely NOT change this number to a phone number).
    • To change the number to your unique phone number, click Edit, change the number and SAVE.
  • Find the Personal Link. This is a personalized URL that you can use to send to students instead of your PMI. It makes it easier for students to join your meeting room by clicking the link, and is persoanlized so they can recognize your name instead of a number.
    • Select Customize next to Personal Link.
    • Enter in the personal URL text desired. We suggest that you use your LPS username.
    • Click Save Changes.

Adding Contacts and Contact Groups

  • In the Zoom app at the top of the window, select Contacts
  • Click the plus button (+) toward the top of the window, then Add a Contact
  • Enter the full email address of the person that you would like to add to your list
  • Click Add.
  • The user will receive a Systems request to add you as their contact. Once they accept, you will see them on your contacts list.
  • To add a contact group click the plus button (+), then Create a Channel and enter the names of those that you would like to group together (they must already be Zoom users).

Zoom Chat Tips (Instant Messaging)

  • Groups are called Channels
  • Personal Channel – Each user will see, in essence, a chat channel just for you. Use this space to collect ideas, draft messages, or save files and links.
  • Starred Messages
    • Users have the ability to click the dropdown arrow on a channel to star it. Starred channels will remain at the top of your list, making it easier to find popular channels.
    • Important messages can also be starred. These starred messages will be bookmarked in a Starred Messages channel. Clicking on a starred message allows you to jump to that channel and the specific message.
  • If you are joining a video chat, these tips will help you present yourself with more professionalism.

Using Zoom for Videoconferencing

Starting a Meeting

  • From the menu at the top of the Zoom application panel, choose Home then click on the orange New Meeting button.
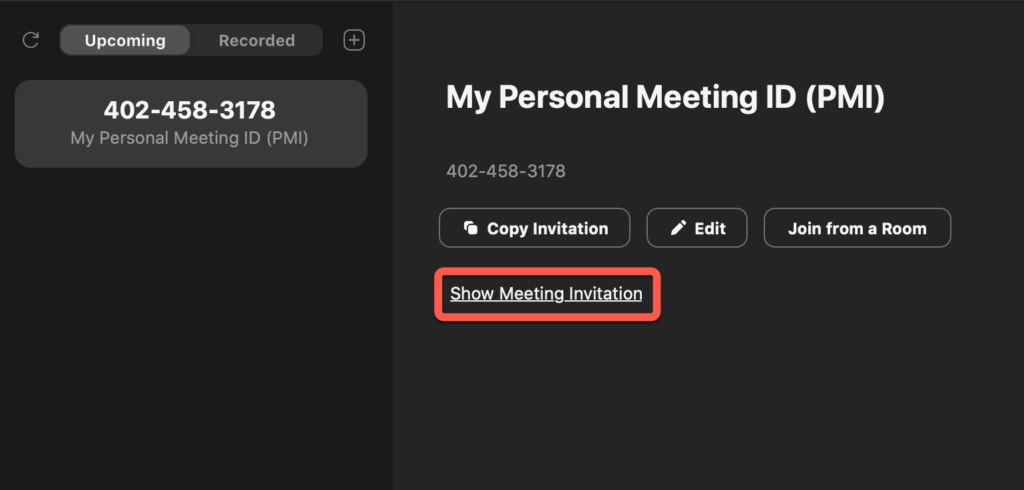
  • You can find your own personal Zoom meeting number (the number others may use to join you in your meeting room) at the top of the Meetings panel.
  • There are a few ways to invite others to join you in a meeting:
    • Sending an invitation: from the Meetings tab, click Copy Invitation, and then paste that text into an email to send to participants.
    • Invite from your meeting room: if you are already in your meeting room, and would like to invite others from there, select Invite at the bottom of the screen, select the users, and then click Invite (to get to your own meeting room, click Join from a Room in the Meetings tab).
    • Copy and share a link: to directly invite participants to your meeting:
      • Click on the Meetings tab
      • Click Show Meeting Invitation
      • Copy the meeting URL (highlighted in yellow in the included image).
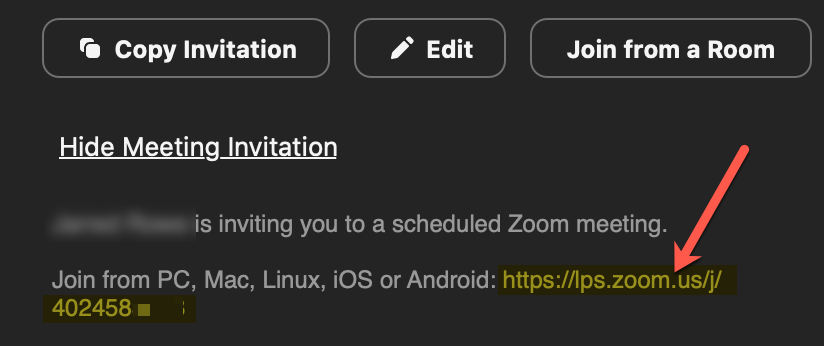
    • You may then paste the link in an email to the participants, share it through Google Classroom, or send it via another communication platform.
      • Just like your PMI (PersonalMeeting ID), this URL will stay the same for purposes of instant meetings. You may decide to use it for any and all of your meetings.
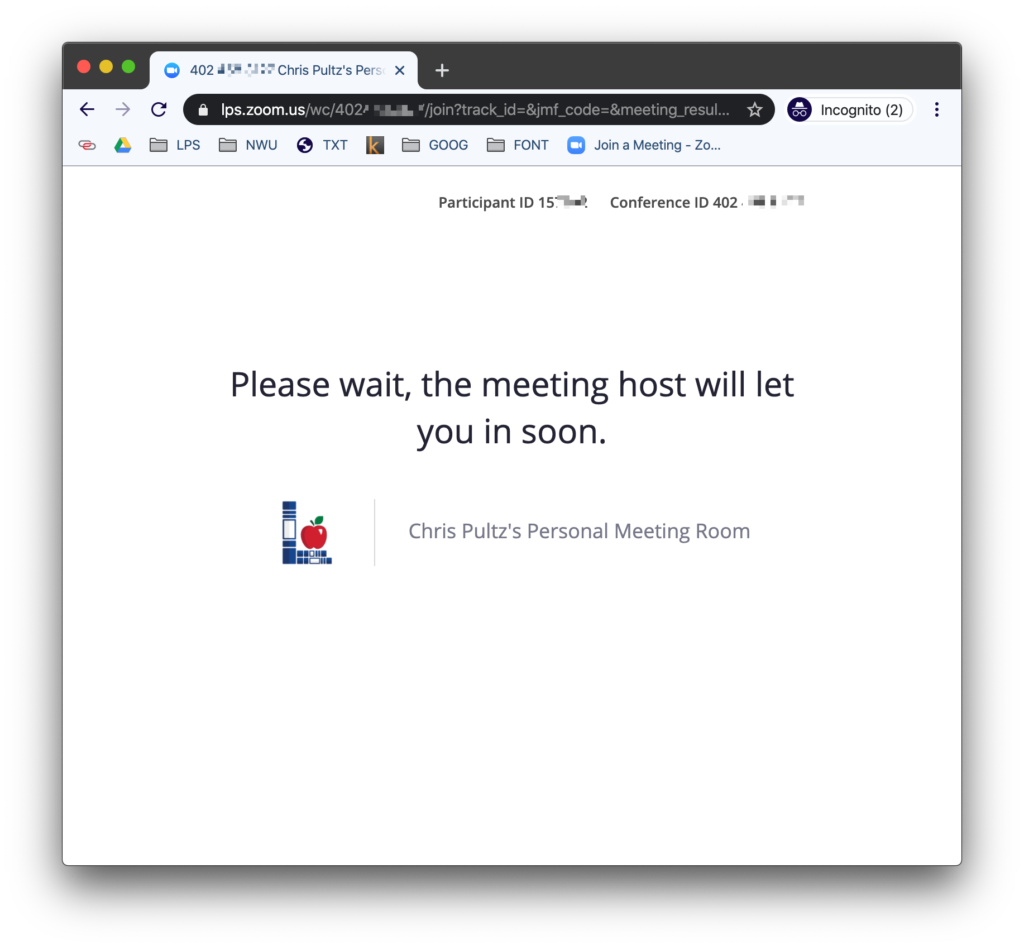
      • For the participants: the link will take participants to a website where they may be prompted to either open the desktop application (if they have it), install the Zoom for Chrome application, or join from their browser. 
    • Share your PMI: in situations where participants have access to the Zoom application and are part of your licensed network, you can merely hold a meeting with them by sharing your PMI. This number can be found in the Meetings tab.
      • For the participants: once in the Zoom application, participants can enter your meeting room by clicking the Home tab at the top of the window, selecting Join, entering your PMI, and then clicking Join.
      • iOS or Android devices can download the free Zoom app, choose Join, and enter the PMI.
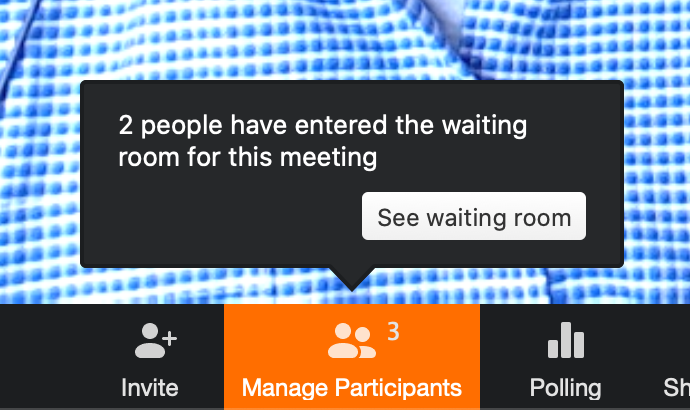
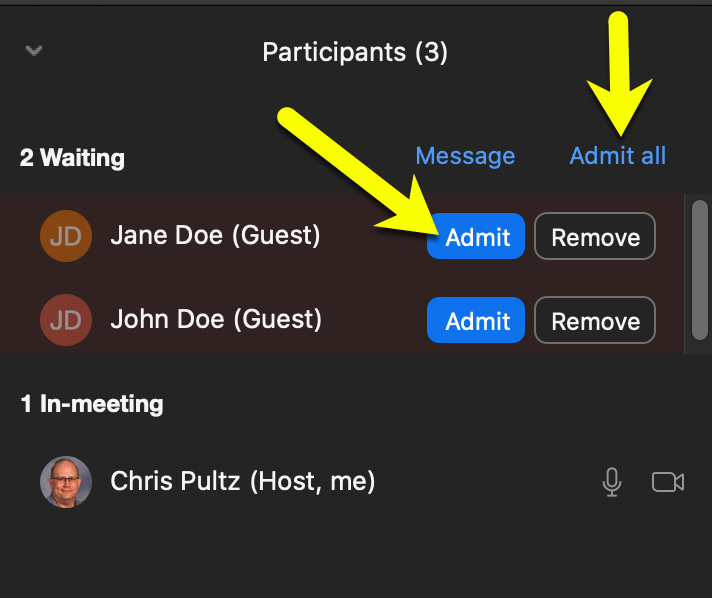
  • If participants join your meeting before you do, you will automatically get an email stating “Your Zoom Attendees are Waiting.” The message will tell you who has already joined.
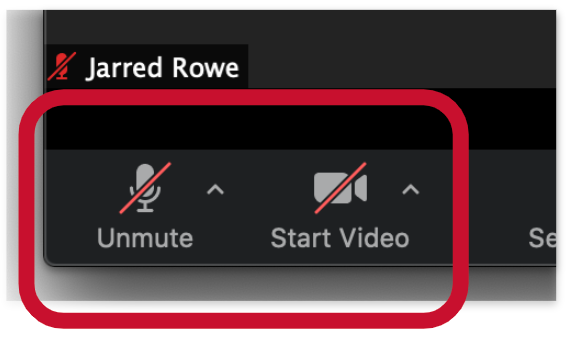
  • In a Zoom meeting, participants can see each other and can chat with the group.
  • If you are using a Distance Learning Cart with LifeSize equipment, dial 162.255.37.11##MeetingIDNumber

Sharing Your Screen

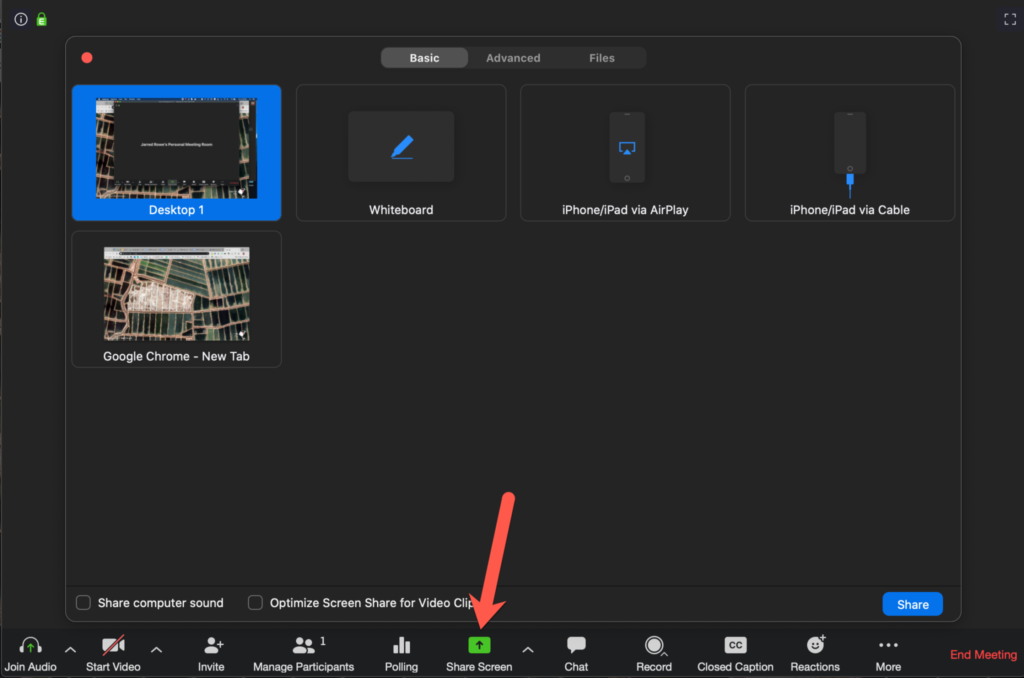
    • From your meeting room, click the Share Screen button to see all screen sharing options that hosts have while conducting a meeting. This includes sharing:
      • An individual window
        • This could include a slide deck presentation, one internet browser, or one application window
      • Your Whole Desktop
        • With or without the computer’s sound (for videos played during meeting)
      • A virtual whiteboard
        • This whiteboard allows you to type, draw, stamp, and spotlight anything on the whiteboard screen

Muting All Participants

  • From your meeting room, click Manage Participants
  • A window will appear to the right of your meeting window
  • Click the Mute All button to mute any participants who might not have muted their own mics.
  • When users are muted, they can use the “Push to Talk” feature. Holding the Spacebar temporarily unmutes the user for all to hear until the spacebar is released. Think of this like a button on a walkie-talkie. Learn more HERE.
  • You also have the option to by default mute all participants upon entry. To enable this feature:
    • Go to Meetings in the Zoom application panel
    • Click Edit
    • Select the Advanced Options dropdown menu at the bottom
    • Check the box for Mute participants on entry.

Recording a Meeting

When in a meeting, hosts can record the meeting to either the cloud (Zoom’s cloud server), or locally on their computer. We currently recommend recording to the computer due to high cloud-recording demand worldwide. To record a meeting:

  • Start the Zoom meeting
  • Click the Record button
    • This might be under the More menu if you’re screen sharing
  • Select Record on this computer

At any time, hosts can stop the recording by clicking Stop Recording button. After the meeting is ended, a Finder window will appear and the recording will be placed into your Zoom folder inside the Documents folder. 

Managing Sound and Video

You’ll want to make sure you know how to appropriately mute both the speaker and/or the microphone and video  when running (or participating in) Zoom meetings. While both options appear to be similar, they mute very different things.

Mute Macbook Speakers
The mute button on the keyboard mutes the computer speakers. This stops sound from coming out, but it does not stop meeting participants from hearing you through the microphone. 

Mute Zoom Microphone & Video
The mute button in the Zoom meeting window mutes the computer’s microphone for the Zoom app. This stops the microphone from sending your voice to the Zoom meeting room. This does not stop the sound from others coming out of your computer’s speakers. 

Muting the video stops the computer’s camera from seeing you, but still allows your voice to be heard through the microphone.

Waiting Room

The host controls exactly who is or is not in the room by using a “Waiting Room.” This allows the host to control when a participant joins the meeting.

Waiting Rooms are Turned on in ALL LPS Accounts by Default. If the Waiting Room is ON:

  • All signed in LPS staff users WILL have to wait in your waiting room.
  • All students and guest accounts (non-LPS) WILL have to wait in the waiting room.

This feature can be adjusted (turned on/off) inside the Zoom web settings. 

Zoom Waiting Room Screen

Managing Guests

The folks at Zoom have shared a quick tutorial on how Meeting Rooms look to hosts. In this example they are “playing Doctor” but the same process might work for Teachers or Psychologists who want to manage users one at a time.

Note that a host can move guests who are already in the room back out into the waiting room. This may be useful for a disruptive student. While you cannot video conference with someone while they are in your waiting room, you can text chat with them before readmitting them to your room.

Admitting Guests

As the host, once you’ve started the meeting, use the Manage Participants button to see your waiting room. 

ZOOM - Waiting Room Alert

In Manage Participants you will see the full list. Then, you’ll have the option to admit participants individually by selecting the blue Admit button next to their name or all at once with the Admit All option on the top right-hand side of your screen.

Zoom - Waiting Room Controls

Added Security

The Waiting Room feature is a great way to secure your Personal Meeting ID. Your PMI is an address where you are always accessible. If someone has your meeting PMI, they can just drop by and try to join meetings in progress. The Waiting Room gives you that security plus added visibility into who is trying to join. 

Locking a Meeting to One or More Participants

  • Meeting Hosts have the ability to lock a meeting to single users, or a small group of users, if needed.
  • Once the participants are in the room, the host must click on the Manage Participants button.
  • Under the More button that appears in the slide-out window, the Host will see Lock Meeting, along with a few other helpful settings. Selecting this option ensures that only the current list of participants is able to attend in the meeting. 

Adding a Co-Host

You can add another teacher as a co-host to help manage student participants and/or the administrative side of the meeting, such as admitting users from the waiting room, muting participants, or starting/stopping the recording.

Co-hosts can be easily assigned during a meeting. To add a co-host:

  1. Click Manage Participants
  2. Click the More button next to the desired co-host
  3. Click Make Co-Host
 

Managing Settings

Manage Mic & Camera Settings

  • Inside of Zoom, click the Home button.
  • In the top-right corner, click on the settings gear icon.
    • From this menu, users can change any necessary settings like video and audio.
  • First time Zoom users might get prompted to allow camera/mic access inside their system privacy settings. To do this:
    • Click on the Apple Menu in the top-left corner of your screen and click System Preferences.
      • Click Security & Privacy
      • Make sure Zoom is checked in both the Camera and the Microphone sections.

Settings in Your Profile

  • From the Zoom Home panel, click Settings at the top.
  • Click Advanced Features
  • Click Edit my Profile
    • This takes you to your Profile on a web page in your default browser where you control how your Zoom account works. (You can now close the Zoom settings window.)
  • Insert a Profile Picture at the top (optional).
  • Find the Personal Meeting ID. This unique number is randomly assigned to you and stays with you for the duration of the use of your Zoom Pro account.
    • Use this ID for instant meetings should be checked (circled below). If it is not, click Edit, check the box, and SAVE.
    • The only reason you would change the Personal Meeting ID would be to possibly change it to your office desk phone number ONLY IF you have a unique office phone number that nobody else has (teachers will likely NOT change this number to a phone number).
    • To change the number to your unique phone number, click Edit, change the number and SAVE.

Settings for Groups

  • If you are hosting a group event, Zoom suggests a few settings that you can select to ensure you have the most control and your viewers have the best experience:
    • Select “Use Dual Monitors” (listed under general settings)
    • Scale to fit my Zoom window when viewing screen shared by others” should be selected by default
    • Select “Enable HD” under the video section
    • Under video settings, select “16:9 widescreen
    • Select “Enable mirror effect” (listed under video settings)
    • Select “Display participant’s name on their video
    • Select “Hide Non-Video Participants

Other Zoom Settings

Notifications

Chat notifications appear as a red dot instead of chat numbers. If you’d like to continue seeing numbers of unread chats per channel, navigate to the Chat settings from the Home button and check the box to Show unread message count for channels.

To turn on system notifications for Zoom (banners, alerts, etc.), go to Apple > System Preferences > Notifications & Focus > Zoom.us and choose the settings most appropriate for you. 

Best Practices

Hosting or Attending a Zoom Meeting

  • Nobody likes the way they look or sound on a recording. It’s human nature. Be confident anyway. 
  • Proactively smile – practice smiling before you even hit record. 
  • Dress professionally, the way you would in a classroom. People tend to look their worst on camera when they wear white or black clothes. Solid colors are better than patterns. Dark grey and jeweled tones can be the best choices.
  • Sit close to the screen. Your face should fill most of it.
  • Look directly into the camera (not the screen) and act like you are speaking to a real person. Let your personality shine through. You’ll appear more engaging for the student viewers.
  • It can be harder to understand people on recordings than in person. When you’re talking, go a little slower than you might normally speak. Pause between sentences. Lower your voice if you naturally have a high pitch voice.
  • Create a list of talking points before you begin. Keep it where you can see it.
  • Let others in your space know you’re recording/holding a meeting
  • In addition to this list, here are a few “human behavior” tips that will help you present yourself well on a video chat.

The Meeting/Recording Environment

  • Make sure the space behind you is clean, free of distractions, and is appropriate for student viewing (No liquor cabinets or sarcastic refrigerator magnets).
  • Don’t sit in a dark room. Make sure the environment is well lit. 
  • Don’t sit with a window behind you. Always face a window or light source if you can. 
  • Be mindful of other family members (and pets!) and the noises they might make. Try to keep them away during the meeting/recording.

Screen Recordings/Sharing your Screen

  • Make sure there is no sensitive info on your screen, like student data, grades, staff communications, etc.
  • Make sure all of the content you want to show is open or loaded and ready to go.
  • Declutter your screen to reduce distractions.
  • Consider what’s visible in your bookmark bar, open tabs, etc.
  • Turn off Zoom chat and text message notifications.

Troubleshooting Tips


Troubleshooting Zoom connections:

  • If you are using Zoom to participate in (or host) meetings and you are disappointed in the audio or video quality, please reference this resource: Zoom Quality Troubleshooting

Participants can’t join my meeting:

  • If students are unable to join your meeting, in the Meetings Tab:
    • Click Edit
    • Click Advanced Options
    • Make sure Only authenticated users can join: Sign into Zoom is UNCHECKED. If this box is checked, students will not be able to join your Zoom meeting, as they are joining via browser, and we do not want students creating their own personal Zoom accounts. 

I need to mute all participants:

  • Click the Manage Participants button.
  • Click Mute All Users in the window that appears.
  • If, in the event you do not want participants to be able to unmute themselves, uncheck the allow participants to unmute themselves option under the More tab (shown to the right).

Additional Resources

Video Tutorials

For more detailed instruction on how to use the many features found in the Zoom.us tool, you might appreciate the tutorials provided by the company in the “How to Zoom!” series on YouTube