Embedding Videos in LPS Web Pages
Sometimes, a video is the best way to communicate a thought or idea. Unfortunately, a video’s file size is often much, much larger than you would ever want to directly upload to a web page. Don’t worry, if you have a video, LPS offers tools that can make it easy to add it to your web page in a way that viewers will appreciate.
When we say we are “Embedding” a video in your page, what we are really saying is that we are making a video that is hosted in another tool, like MyVRSpot, appear as though it is part of your web page. It will stream to the viewer in a way that is just right for the device they are viewing from, just as they would expect it to.
The basic steps involved in making this work are to:
1. Put the video in MyVRSpot
2. Copy an “embed code” for the video
3. Paste that “Embed code” in your web page

1) Put the Video in MyVRSpot
LPS has a tool specifically for hosting & serving videos for your instructional needs. It is called MyVRSpot. (If your video is already in MyVRSpot, skip this step.)
To add videos to MyVRSpot:
- Sign in to MyVRSpot through the LPS Portal.
- Find the “Upload” link at the top of your MyVRSpot screen. Click on the Upload link.
- You have two options when using the Upload tool; drag and drop your files into the upload box; or click your mouse to navigate to the file on your computer’s drive. (You can upload multiple files at a time.)
- Once a file has completed the upload process, an Edit button will appear under the uploaded item. Click the Edit button.
- Make any descriptive changes to the information about this video, as desired. Click Update at the bottom of the page.
NOTE: DO NOT embed videos to which you are not the copyright holder! If you did not create the video yourself, there is a very good chance that you cannot legally embed them in the public view. (This is especially true of videos sourced from YouTube.)
If you have an instructional need for students to access a video you are not the copyright holder for, consider placing the video in a secured location like MyVRSpot or Google Drive and linking to it from your website or Google Classroom rather than embedding it. This makes it available only to authenticated LPS students & staff, which is the legal and ethical way to get it to students.

2) Copy the “Embed Code” for the video
Now that the video is uploaded to MyVRSpot, you will want to locate and copy the “embed code” needed to make this video appear in another web page editing tool, like WordPress or LMS Pages
To copy the Embed Code for the video
- Find the video in your MyVRSpot Home screen. Click on it to open the information about the video.
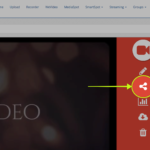
- Find the “Embed” button and click on it. Clicking this link gives two options for sharing of a video.
- The first option (“Share with Link”) provides a unique URL link to the video that is viewable by anyone on Earth. This can be a useful link for use in tools like Google Classroom, or any other place you want to simply provide a link to your video. Just make sure the video is OK for sharing with a general audience.
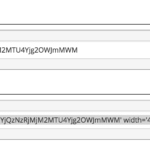
- The second option (“Embed Code”) is the one you are looking for. You can copy and paste this code into any of your web pages. When a visitor to your webpage clicks the video play button, the video will automatically stream from the MyVRSpot system.
- Select all of the text in the Embed Code area and copy it.
3) Paste that “Embed Code” into your web page
This step will be different, depending upon the web page tool you are using. In every case, you are looking for a way to paste the embed code in, so that the video will be loaded in your web page when visitors visit.
In WordPress...
- Log into your WordPress site.
- Open (edit) the appropriate Page or Post.
- In the top right corner of the editor, you should see a tab that lets you switch between editing in “Visual” or “HTML” modes. Select HTML.
- In the body of the web page, place your cursor where the video belongs.
- PASTE the code you copied from MyVRSpot.
- “Publish” or “Update” your WordPress page.
- Depending upon your situation, to see the embedded video, you might want to click either:
- “View Post” or “View Page” at the top of the screen
Or - “Preview Changes” in the top-right corner of the screen
- “View Post” or “View Page” at the top of the screen
NOTE: When you return to WordPress you will still be shown the HTML tab, which is probably not where you’d like to be working most of the time. Simply return to the tabs and select “Visual” again to return to normal WordPress use.
In New Google Sites...
- Open (as an editor) the appropriate page in your Google Site.
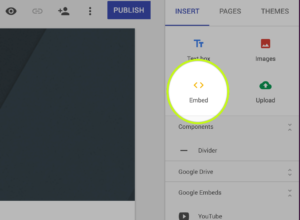
- Click on the “Embed” button in the INSERT menu of the right-hand column of the page editor.
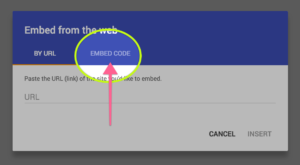
- In the “Embed from the web” pop-up, click the “EMBED CODE” tab
- In the field provided, PASTE the code you copied from MyVRSpot.
- Click NEXT
- Click INSERT
- Drag & drop the video to the desired location in your page, using the handles to resize it as needed.
- Click the eyeball icon at the top of the screen if you choose to Preview your changes.
- Click PUBLISH at the top of the page to confirm (save) your changes.
Did something not work?
If you run into difficulty during this process, don’t be dismayed. Embedding videos within web sites can be tricky business at times. You should always be able to provide students with a LINK to your videos. Then, as time allows feel free to submit a Help Desk ticket in the category Software / LPS Web Services / WordPress. We can help!
Updated March 9, 2018


You must be logged in to post a comment.