
Login
All LPS Staff can sign in to Hāpara. Only a “teacher of record” in an active LPS course (and the co-teachers) are able to see students in classes.
Highlights
Highlights offers teachers a view of student and class web browser use, and the ability to focus, freeze, filter, or pause student work through management of browser tabs.
Student Dashboard
Student Dashboard helps students organize their digital school life, listing Google Classroom assignments by due date and any direct email messages from teachers. Student Dashboard has no direct ties to the Hāpara tools used by teachers. Students can access Student Dashboard via the LPS Portal.


Accessing Hāpara Classes
After login, staff who have Hāpara access will land on the “My Classes” tab, which only shows favorited (starred) classes. In order to locate ALL of the classes in which you have access, click the “All Classes” tab. From this list, staff can search by section/name of the class or by staff member. Clicking the star icon on a class moves it into your “My Classes” tab.
Administrators and Teacher Associates have access to all classes within their assigned building.
Teacher Created Classes
Teachers can create their own “ad-hoc” classes within Hāpara. This allows Hāpara to be used outside of the regularly scheduled courses in Synergy. This feature is especially useful for fluid grouping situations. Examples might be:
- Elementary classes
- After school academic support sessions
- School-sponsored clubs and groups
- Tracking groups for counselors and/or administrators
How to Create a Class
- In the Manage Classes screen, select the Add New Class button
- Select the school where you want to add the class to
- Enter a name for the Class, then click Add Class
- On the Class Info page for the new Class, choose Add New to add teachers or students to the class. Teachers need to be added by email address (@class.lps.org) individually, students can be added either individually or in a comma separated list of email addresses (@class.lps.org).
Learn more
NOTICE:
I understand that use of this Hāpara feature is permitted only if it is pertinent to my work assignment at Lincoln Public Schools.
I understand that use of this Hāpara feature is permitted only if it is pertinent to my work assignment at Lincoln Public Schools.
Highlights
In Highlights, teachers see a dashboard of student panels, just like in Teacher Dashboard. However, the content shown is not from Google Drive; it is from the Google Chrome web browser on their Chromebook.
For more in-depth information about Highlights use the links provided at the right.
Browser Tabs
Presented in the student panels is a list of browser tabs open on the student devices.
- Hover your mouse over a tab’s text to preview it.
- Click the (X) to close the tab for the student.
- Click the link icon or the Share Links button in the top right corner of the screen to open a new tab (with the web page of your choosing) for the student.
- Refresh rate is typically within seconds
Activity Viewer
The activity viewer provides a dashboard and set of data around the class’ activities in Chrome. Teachers can feel welcomed to leave their own computer screen and move around the room without missing any digital activity. This information disappears once the teacher switches to a new class in Hāpara.
Current activity is presented as BLUE data, historical activity with ORANGE data. Clicking on data identifies student names.
Teachers can capture a snapshot (Snap) of the students’ activity on a site with a click. These snaps provide opportunities for positive supports or evidence of behavioral interventions which might be necessary. These Snaps live within the Recordings page for 7 days. At any time within this week, teachers can send feedback to either the student or their own inbox for later communications with administrators and/or parents.
Snaps allow a teacher to see:
- Date and time of the snap
- URL being viewed by the student(s)
- A screen image when the Snap was taken
- Whether the Snap was unique activity, or whether multiple students visited this page.
Messages
Teachers are able to send pop-up messages to individual screens or all student screens simultaneously. This allows for positive encouragement or private corrections without disrupting the classroom work environment.
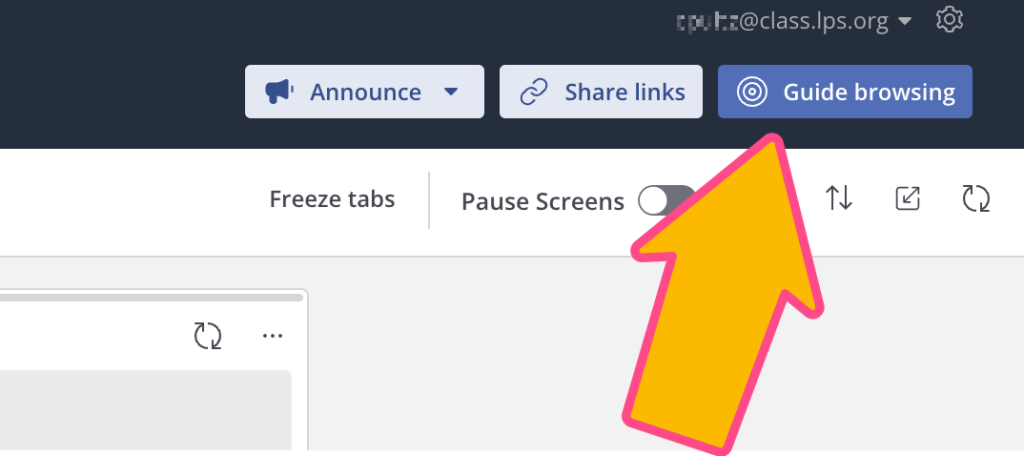
Guided Browsing
Hāpara offers two options to help guide student browsing:
Focused Browsing
The Focused Browsing tool allows a teacher to send tabs to student Chromebooks and restrict web access. Access can be restricted to a tab or set of tabs (up to 10) for a defined period of time. This can be helpful to limit the browsing experience for students, and to keep them focused on course-specific sites/tasks for periods of time.
Find more detailed information on the Hāpara Focused Browsing, view tips for its use in LPS in the section below.
Release a Student
Any teacher can release a student from a focused browsing session started by a different teacher. Simply click the target icon in the student’s card.
Filtered Browsing
The Filtered Browsing tool allows a teacher to restrict certain sites from student screens. Whereas focused browsing says students can only visit specific sites, Filtered Browsing says students can visit any website (allowed by LPS) except the teacher-decided list of sites. This could be useful if a curriculum game site is being overused by students, or if a teacher might want to block textbook sites, Google, Wikipedia, etc. for a specific class period.
Filtered Browsing for Managing Nuisance Sites
- Click Guide Browsing
- Click Set up a Filter session
- Enter the sites you’d like to block from students (up to 50).
- Set the session time-limit.
- Schedule the session for a later date/time if desired.
- Save the session as a template if you’d like to repeat this session for other classes/days.

Freeze Tabs
This feature can be useful for a variety of instructional purposes including:
- Creating personalized focus sessions: When each student opens the materials they need for the lesson, freeze those web pages in place.
- Focusing students on assessments from Google Classroom or Workspace: Each student can open their specific assessment document. Then you can freeze on those pages.
- Accommodating login pages and redirects: Sometimes it can be difficult to create focus sessions on websites with login pages or redirects. With the Freeze tabs feature, you can have students log in to the sites they should be working on. Then freeze on those pages.
More information can be found HERE.
Pause Browsing
The Pause Screens feature in Highlights allows teachers to pause learners’ screens for a moment to get their attention. Screens can be paused for up to 15 mins at a time. More information can be found HERE.
Scheduled Browsing
Teachers can plan ahead and schedule browsing sessions using the Guide Browsing button in the top right corner of the screen. Specific URLs can be scheduled to open (with restricted access, if desired) at specified times per period.
Have an online quiz planned? Teachers can schedule it to open automatically at the start of class, giving learners more time to work. Making sub plans? Teachers can schedule tabs to open, so learners have everything they need. Learn more HERE.
Learn more
Close vs. Block Tabs?
Educators have the option to close or block an open Chromebook tab. Closing a tab reminds a student to refocus on the lesson at hand. Blocking is the same as creating a “Filtered Browsing” session, but quicker.
Privacy
The Hāpara Highlights tool only runs while the student device is on the LPS school network. Teachers will not be able to monitor tabs & screens, nor send messages to students if their device is off of a school network.
The Hāpara Highlights tool only runs while the student device is on the LPS school network. Teachers will not be able to monitor tabs & screens, nor send messages to students if their device is off of a school network.
Guided Browsing Tips
“Guided Browsing” allows a teacher to open specific tabs (URLs) on the Chromebooks of students in your class while limiting their access to the rest of the internet. When a Guided Browsing session is active, students can’t open new tabs or browse to new sites.
In many instructional situations, a teacher may want to be prescriptive in the URLs they provide to students during Guided Browsing sessions. Following are some examples that may be helpful in specific situations:
Tools that are Always Allowed
LPS has configured a number of tools so that they are ALWAYS allowed for students, even during Hāpara focused browsing. The benefit of this is that teachers do not have to know or add the URLs required for these tools to work during focused browsing sessions.
- Amplify
- Clever
- Code.org
- Digital Hall Pass
- Ebsco
- G-W Online (Goodheart Wilcox)
- Houghton Mifflin Harcourt (HRW)(HMH)
- Lexia Core5
- LPS Portal (ClassLink)
- McGraw-Hill
- Pear Deck
- Scholastic
- Synergy StudentVUE
- ThinkCentral
- Zoom meetings
TIP: Freeze Tabs
If you are trying to limit students to a site, but struggling because the site requires too many URLs that you don’t know, here’s a strategy: FREEZE TABS!
- Have students visit the LPS Portal
- Give them 30 seconds to find and open the tool you want them to use. Allow the authentication to happen.
- If there is a specific lesson or place the students need to open in the tool, offer directions.
- In Hapara, click “Freeze Tabs” in the top-right of the teacher dashboard. This will limit students to the tabs they currently have open.
- If desired, close any tabs that you are uncomfortable with.
It doesn’t work in every situation, but it does in most!
Google Workspace Tools
Hāpara Guided Browsing sessions work great with the various Google Workspace products. Here are the URLs that you will want to know when setting up work sessions for students.
Google Classroom
Remember that Google Classroom is just the website where you hand files in-and-out. In addition to the Classroom URL, they’ll need the address of any other necessary Google tools, along with linked web resources (see above).
Google Drive
Includes all items stored in Google Drive that students may need to access. PDFs, JPG, MOV, etc.
Google Docs
Includes Sheets, Slides, Drawings, Forms, etc.
Google Forms
When focus browsing your students to a Google Form, you must use the specific URL (Preview link) of your Form, but you must also be sure to select the focus browse option that says Limit browsing to anywhere in these site(s). Otherwise, student responses will not save in the Form results.
Gmail
TIP: “Limit Browsing to:”
Be sure to check the “Limit browsing to anywhere in these site(s)” option when focusing students using Google tools.

Amplify
Teachers may focus a class of students to Amplify ELA/CKLA/Science using the URL above, but not to a specific Unit, Sub-Unit, Lesson, or page within the curriculum. Students will be able to move about from page to page within Amplify.
eLearning
Apex
Use BOTH of these links (simultaneously) when focusing students to take any computer scored tests in APEX. Be sure to choose that students can go to “The whole site” when creating the browsing session.
edmentum
After focusing students to edmentum.com, they will be able to open a new tab to the LPS Portal and launch edmentum.
AV2 Ebooks
AV2 consists of a few different sites, each of which requires a different URL.
AV2 Fiction
AV2 Nonfiction
AV2 World Language
Career Cruising
CPM Ebook
NOTE: Focused browsing to CPM may or may not work for you, depending upon the tools in CPM you want students to use. This tool requires an array of different URLS, depending upon the activities students may be doing in the tool.
The following URLs are needed if students will need the corresponding tool links:
HRW Dashboard
Kami
Let’s Go Learn
Lexia
Be sure to copy the entire URL above. If you are missing the LPS Site ID, students will be creating a new account instead of using their LPS credentials.
Library Databases & eBooks
If you are looking for a library database or ebook URL and it is not listed on this page, please refer to one of the following spreadsheets:
Lightbox Ebooks
Use this link to focus students to Lightbox. Be sure to choose that students can go to “The whole site” when creating the browsing session.
NewsBank
Pear Deck
The Portal
The LPS Portal is unique. Since so many tools are accessed through the Portal, we always allow it for students. This means students will always have access to the Portal page, and it doesn’t need be one of the links you send in focused browsing sessions!
Students will not be able to open tools linked from the Portal unless you’ve allowed the specific tool(s) in the focused browsing session (ex. Google Classroom, etc.).
If you need the Portal’s URL for link sharing, use https://students.lps.org
Sora
Allowing students to use Sora requires two things. Focus them to this URL:
then be sure to select “Limit browsing to anywhere in these site(s).”
Synergy Assessments
Typing Club
World Book
World Book eBooks
Suggestions?
Is a tool you use in Focused Browsing mode and you think others would benefit from the URLs as well? If so, please email them to Chris Pultz (@lps.org) for inclusion here.
Early Exit?
Sometimes students accidentally close tabs too early. They might not remember which tabs they're allowed to open again. If this happens, here's a helpful tip:
- Have the student use the keyboard shortcut ctrl+shift+t to open the last tab they closed. They can repeat this keystroke to re-open the 10 most recently closed tabs if needed.
- You (the teacher) can also end the focused browsing session for just that student. Once they are released you can re-send them a focused browsing URL session.
Hāpara on an iPad
Functionality
Hāpara can be used on an LPS iPad via either the Chrome or Safari application. Simply visit https://teacherdashboard.com/ and sign in with your @class.lps.org account. This mobile version still has all the same capabilities as the desktop site, and can help free up teachers with iPads to move around the room and continue to monitor and guide student learning.
NOTE: In order for login to work, a default web browser setting must be changed inside of the iPad’s Settings app:
Google Chrome
Inside the Settings app, choose Chrome. Then toggle ON the setting that says “Allow Cross-Website Tracking.”
Safari
Inside the Settings app, choose Safari. Then toggle OFF the setting that says “Prevent Cross-Site Tracking.”
Troubleshooting Issues
Most Hāpara issues can be easily resolved by following the guidance below.
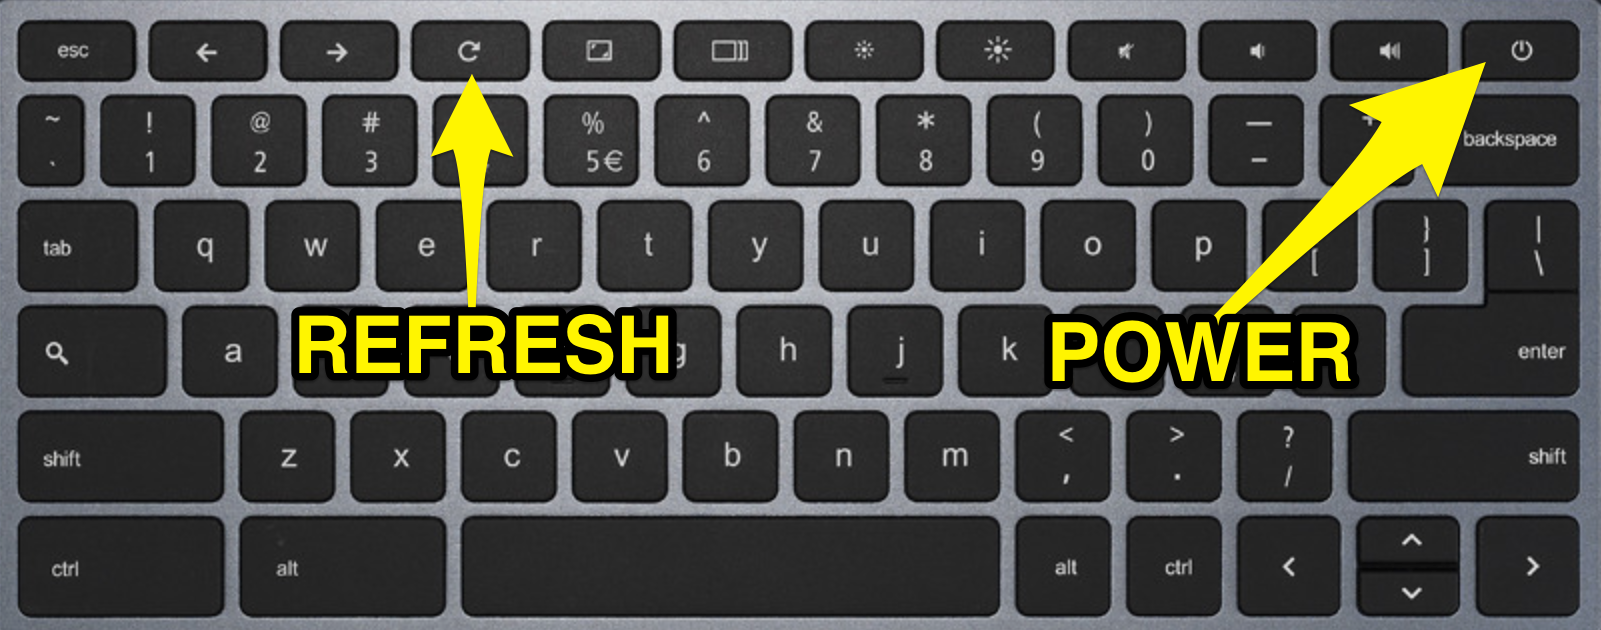
Quick Reboot
A quick restart of the Chromebook usually corrects this situation. In the process of the restart, the user is logged out and logged back in.
To Quickly Restart a Chromebook:
Have the student press the Refresh button + Power Button at the same time. Both buttons are located in the top row of the keyboard. Refresh is over the 3-4 keys. Power is at the far right.
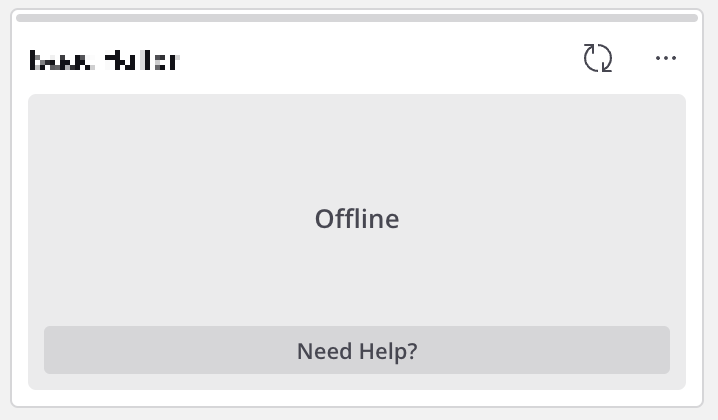
Student is offline
The troubleshooting steps above typically resolve the “Student is offline” notification shown below.
Assumptions
If you are seeing the “Student is offline” error, we will assume a few things:
- You are a teacher successfully logged into Hāpara
(indicating that this is not a teacher login issue) - You see panels for the appropriate courses and students
(indicating that this is not an error in syncing Synergy data with Hāpara) - You are in the Interact (Highlights) tab of Hāpara, and see the browser tabs or current screens of some students, but not all
(indicating that this is not a network error on the teacher laptop, and that Hāpara Interact is working correctly)
If any of these assumptions are NOT true, please enter a Help Desk ticket indicating so.
Requirements
If these assumptions are true, the issue likely lies with the student Chromebook. For Highlights to work appropriately for teachers in Hāpara, the following must be true:
- Chromebook is awake and student is signed in as themself.
- Chromebook is connected to the LPS wireless network.
- The Hāpara Highlights Chrome extension on the student Chromebook must be working.
Student is logged into multiple devices
A student can be logged onto multiple devices (say two laptops) simultaneously. If the devices all have the Highlights extension installed, then the teacher will “see” both devices. Highlights can’t automatically choose which of the devices to display to the teacher. The teacher has to select one.
In some instances, the student may not know why they are signed into two devices. In other situations, a student may be signed into MANY devices. In these cases the student needs to sign out of all of the other devices they are signed into. This can be done through the student’s Gmail account by following these instructions.
